 三色声光报警器运用
# Smart三色声光报警器运用
# 1. 说明
Smart 通过 RestAPI 读取 TARS 物联网模块中连接的设备的信息并显示在页面中,使用 RestAPI 实现对三色声光报警器的控制等相关功能。
声光报警器,是一种用在危险场所,通过声音和各种光来向人们发出警示信号的一种报警装置,可用于钢铁冶金、电信铁塔、起重机械、工程机械、港口码头、交通运输、风力发电、远洋船舶等行业; 是工业报警系统中的一个配件产品。声光报警器根据可发光的颜色类型,可分为单色声光报警器与多色声光报警器。而多色声光报警器中以三色声光报警器居多。三色声光报警器可发出红、绿、黄三种颜色,可用于机台设备状态的指示。同时也可发出闪光和声音,可用作警报提示。

在工厂生产过程中,通常会关注设备的大致运行情况,比如设备是否处于运行状态,设备是否出现故障,设备是否在空转。使用三色声光报警器可解决上述需求,通过LED灯指示与声音报警,现场工作人员可以及时了解设备所处的运行状态,对设备故障及时处理。
当前范例选用带有数据通信功能的三色声光报警器作为被采集的对象。三色声光报警器使用 RS485 串口通信,使用 ModbusRTU 通信协议实现状态读取与控制。三色声光报警器采用直流供电的方式,在 12V-36V 之间均可以进行工作。
示例中的声光报警器 Modbus 寄存器采用保持寄存器,通过读取写入特定地址实现控制功能。
| 功能 | 地址位 | 取值说明 |
|---|---|---|
| 设备是否在线 | 63(0x3F) | 低位的取值为 08 时表示设备在线,即取得的数字进行取余数操作 x mod 256 = 8 表达式成立时设备在线 |
| 播放状态 | 66(0x42) | 1025 正在播放、1024 停止播放 1026 暂停播放 |
| 音量 | 67(0x43) | 低位地址的数值表示音量等级 01-1E 即 0-30 |
| 音频文件数量 | 73(0x49) | 返回的数据表示存放的文件数量 |
| 当前播放曲目 | 77(0x4D) | 曲目的序号 |
| 声光状态 | 112(0x70) | 高位 - 当前播放的曲目 低位 - 声光状态 |
数值与声光状态对照表
| 数值 | 对应灯状态 | 数值 | 对应灯状态 |
|---|---|---|---|
| 17(0x11) | 红灯常亮 | 35(0x23) | 绿灯慢闪 |
| 18(0x12) | 黄灯常亮 | 49(0x31) | 红灯爆闪 |
| 19(0x13) | 绿灯常亮 | 50(0x32) | 黄灯爆闪 |
| 33(0x21) | 红灯慢闪 | 51(0x33) | 绿灯爆闪 |
| 34(0x22) | 黄灯慢闪 | 96(0x10/0x20/0x30/0x60/0x06…)等 | 灯熄灭 |
在上述采集到的数据中,声光状态是重要数据,通过对声光状态的数据解析可以了解声光报警器的亮灯状态。
方案采用 TARS 进行数据采集,在物联网界面中设置采集的设备的串口连接信息、读取的位置等信息。将读取到的数据通过解析后转存至指定的数据库中,等待数据分析。在这个过程中,TARS会将采集到的数据进行解析,获取声光状态,并进行转存操作。
存储数据的表结构如下,请在 demo 数据库中创建执行:
---设备信息表,用于更新设备当前的状态
CREATE TABLE [dbo].[oee_device](
	[id] [varchar](36) NOT NULL,
	[moduleno] [varchar](50) NULL,
	[modulename] [varchar](50) NULL,
	[moduledesc] [varchar](50) NULL,
	[sid] [int] NULL,
	[commid] [varchar](36) NULL,
	[enabled] [bit] NULL,
	[online] [bit] NULL,
	[light] [varchar](10) NULL,
	[flash] [varchar](10) NULL,
	[sound] [int] NULL,
	[soundstate] [varchar](10) NULL,
	[volume] [int] NULL,
	[updatetime] [datetime] NULL,
 CONSTRAINT [PK_oee_device] PRIMARY KEY CLUSTERED
(
	[id] ASC
)WITH (PAD_INDEX = OFF, STATISTICS_NORECOMPUTE = OFF, IGNORE_DUP_KEY = OFF, ALLOW_ROW_LOCKS = ON, ALLOW_PAGE_LOCKS = ON) ON [PRIMARY]
) ON [PRIMARY]
GO
---设备数据采集表,用于更新设备信息
CREATE TABLE [dbo].[oee_devicedata](
	[id] [varchar](36) NOT NULL,
	[moduleid] [varchar](36) NULL,
	[moduleno] [varchar](50) NULL,
	[modulename] [varchar](50) NULL,
	[site] [varchar](100) NULL,
	[time] [datetime] NULL,
	[value] [varchar](200) NULL,
	[online] [bit] NULL,
	[light] [varchar](10) NULL,
	[flash] [varchar](10) NULL,
	[sound] [int] NULL,
	[soundstate] [varchar](10) NULL,
	[volume] [int] NULL,
	[lastvalue] [varchar](200) NULL,
	[lastlight] [varchar](10) NULL,
	[lastflash] [varchar](10) NULL,
	[lastsound] [int] NULL,
	[lastsoundstate] [varchar](10) NULL,
	[lastvolume] [int] NULL,
 CONSTRAINT [PK_oee_devicedata] PRIMARY KEY CLUSTERED
(
	[id] ASC
)WITH (PAD_INDEX = OFF, STATISTICS_NORECOMPUTE = OFF, IGNORE_DUP_KEY = OFF, ALLOW_ROW_LOCKS = ON, ALLOW_PAGE_LOCKS = ON) ON [PRIMARY]
) ON [PRIMARY]
2
3
4
5
6
7
8
9
10
11
12
13
14
15
16
17
18
19
20
21
22
23
24
25
26
27
28
29
30
31
32
33
34
35
36
37
38
39
40
41
42
43
44
45
46
47
48
在 TARS 物联网设置项中,在 设备监控设置 项目中创建两个 Modbus 设备监控项。可参考 TARS-物联网 进行操作。
| 设备编号 | 设备名称 |
|---|---|
| 015 | light001 |
| 016 | light002 |
每个设备分别设置如下站点:
| 站点名称 | 数据类型 | 功能代码 | 数据地址 | 数据长度 | 监控周期 | 保存频率 | 实时传值 | 站点类型 |
|---|---|---|---|---|---|---|---|---|
| rsoundstate | Integer | 03ReadHoldingRegister(4x) | 66 | 1 | 30 | 30 | true | read |
| rvolume | Integer | 03ReadHoldingRegister(4x) | 67 | 1 | 30 | 30 | true | read |
| rdevicestate | Integer | 03ReadHoldingRegister(4x) | 63 | 1 | 30 | 30 | true | read |
| rtotalfiles | Integer | 03ReadHoldingRegister(4x) | 73 | 1 | 30 | 30 | true | read |
| rsoundnum | Integer | 03ReadHoldingRegister(4x) | 77 | 1 | 30 | 30 | true | read |
| rledstate | Integer | 03ReadHoldingRegister(4x) | 112 | 1 | 30 | 30 | true | read |
| wsound | Integer | 06PresetSingleRegister(4x) | 15 | 1 | 5 | 30 | true | write |
| wnextplay | Integer | 06PresetSingleRegister(4x) | 1 | 1 | 5 | 30 | true | write |
| wledstate | Integer | 06PresetSingleRegister(4x) | 194 | 1 | 5 | 30 | true | write |
| wpreviousplay | Integer | 06PresetSingleRegister(4x) | 2 | 1 | 5 | 30 | true | write |
| wplayindex | Integer | 06PresetSingleRegister(4x) | 3 | 1 | 5 | 30 | true | write |
| wvolumeplus | Integer | 06PresetSingleRegister(4x) | 4 | 1 | 5 | 30 | true | write |
| wvolumeminus | Integer | 06PresetSingleRegister(4x) | 5 | 1 | 5 | 30 | true | write |
| wvolume | Integer | 06PresetSingleRegister(4x) | 6 | 1 | 5 | 30 | true | write |
| wplayrepeat | Integer | 06PresetSingleRegister(4x) | 8 | 1 | 5 | 30 | true | write |
| wplaydevice | Integer | 06PresetSingleRegister(4x) | 9 | 1 | 5 | 30 | true | write |
| wbaudrate | Integer | 06PresetSingleRegister(4x) | 11 | 1 | 5 | 30 | true | write |
| wchipreset | Integer | 06PresetSingleRegister(4x) | 12 | 1 | 5 | 30 | true | write |
| wplay | Integer | 06PresetSingleRegister(4x) | 13 | 1 | 5 | 30 | true | write |
| wpause | Integer | 06PresetSingleRegister(4x) | 14 | 1 | 5 | 30 | true | write |
| wfolderfileplayrepeat | Integer | 06PresetSingleRegister(4x) | 16 | 1 | 5 | 30 | true | write |
| wplayrepeatall | Integer | 06PresetSingleRegister(4x) | 17 | 1 | 5 | 30 | true | write |
| wstopplay | Integer | 06PresetSingleRegister(4x) | 22 | 1 | 5 | 30 | true | write |
| wfolderplayrepeat | Integer | 06PresetSingleRegister(4x) | 23 | 1 | 5 | 30 | true | write |
| wplayrandom | Integer | 06PresetSingleRegister(4x) | 24 | 1 | 5 | 30 | true | write |
| wnowplayrepeat | Integer | 06PresetSingleRegister(4x) | 25 | 1 | 5 | 30 | true | write |
| wsid | Integer | 06PresetSingleRegister(4x) | 192 | 1 | 5 | 30 | true | write |
其中 rvolume 设置的数据脚本如下:
begin
  This.DataValue := This.DataValue mod 256;
end.
2
3
rvolume 设置的数据转存脚本如下:
declare @volume int,
		@lastvolume int
SELECT @volume = :DataValue,@lastvolume = :LastValue

INSERT INTO oee_devicedata
(id, moduleid, moduleno, modulename, site,
  time, value, online, light, flash,
  sound, volume, lastvalue, lastlight,
  lastflash, lastsound, lastvolume)
VALUES (NEWID(), :ModuleID, :ModuleNo, :ModuleName, :Site,
  GETDATE(), :DataValue, NULL, NULL, NULL,
  NULL, @volume, :LastValue, NULL, NULL,
  NULL, @lastvolume)

IF exists(SELECT 1 FROM oee_device WHERE ModuleNo = :ModuleNo)
	UPDATE oee_device set volume = @volume, updatetime = GETDATE() WHERE ModuleNo = :ModuleNo
ELSE
  INSERT INTO oee_device(id,moduleno,modulename,volume,updatetime)
  VALUES(NEWID(),:ModuleNo,:ModuleName,@volume,GETDATE())
2
3
4
5
6
7
8
9
10
11
12
13
14
15
16
17
18
19
rdevicestate 设置的数据脚本如下:
begin
  This.DataValue := This.DataValue mod 256;
end.
2
3
rdevicestate 设置的数据脚本如下:
declare @online bit
SELECT @online = CASE :DataValue WHEN 8 THEN 1 ELSE 0 END

INSERT INTO oee_devicedata
(id, moduleid, moduleno, modulename, site,
  time, value, online, light, flash,
  sound, volume, lastvalue, lastlight,
  lastflash, lastsound, lastvolume)
VALUES (NEWID(), :ModuleID, :ModuleNo, :ModuleName, :Site,
  GETDATE(), :DataValue, @online, NULL, NULL,
  NULL, NULL, :LastValue, NULL, NULL,
  NULL, NULL)

IF exists(SELECT 1 FROM oee_device WHERE ModuleNo = :ModuleNo)
	UPDATE oee_device set [online] = @online, updatetime = GETDATE() WHERE ModuleNo = :ModuleNo
ELSE
  INSERT INTO oee_device(id,moduleno,modulename,[online],updatetime)
  VALUES(NEWID(),:ModuleNo,:ModuleName,@online,GETDATE())
2
3
4
5
6
7
8
9
10
11
12
13
14
15
16
17
18
rsoundstate 设置的数据脚本如下:
declare @soundstate varchar(10),
		@lastsoundstate varchar(10)

SELECT @soundstate = CASE :DataValue WHEN 1025 THEN 'play'
WHEN 1024 THEN 'stop' WHEN 1026 THEN 'pause' END,
@lastsoundstate = CASE :DataValue WHEN 1025 THEN 'play'
WHEN 1024 THEN 'stop' WHEN 1026 THEN 'pause' END

INSERT INTO oee_devicedata
(id, moduleid, moduleno, modulename, site,
  time, value, online, light, flash,
  sound, soundstate, volume, lastvalue, lastlight,
  lastflash, lastsound, lastsoundstate, lastvolume)
VALUES (NEWID(), :ModuleID, :ModuleNo, :ModuleName, :Site,
  GETDATE(), :DataValue, NULL, NULL, NULL,
  NULL, @soundstate, NULL, :LastValue, NULL, NULL,
  NULL, @lastsoundstate, NULL)

IF exists(SELECT 1 FROM oee_device WHERE ModuleNo = :ModuleNo)
  UPDATE oee_device set soundstate = @soundstate, updatetime = GETDATE() WHERE ModuleNo = :ModuleNo
ELSE
  INSERT INTO oee_device(id,moduleno,modulename,soundstate,updatetime)
  VALUES(NEWID(),:ModuleNo,:ModuleName,@soundstate,GETDATE())
2
3
4
5
6
7
8
9
10
11
12
13
14
15
16
17
18
19
20
21
22
23
rledstate 设置的数据脚本如下:
declare @light varchar(10),
		@flash varchar(10),
		@sound int,
		@lastlight varchar(10),
		@lastflash varchar(10),
		@lastsound int

SELECT @light = CASE (CAST(:DataValue AS INT) % 16) WHEN 0 THEN 'off'
WHEN 1 THEN 'red' WHEN 2 THEN 'yellow' WHEN 3 THEN 'green' END,
@flash = CASE (CAST(:DataValue/16 AS INT) % 16)  WHEN 6 THEN 'off' WHEN 0 THEN 'off'
WHEN 1 THEN 'no' WHEN 2 THEN 'slow' WHEN 3 THEN 'fast' END,
@sound = CAST(:DataValue/256 AS INT)

SELECT @lastlight = CASE (CAST(:LastValue AS INT) % 16) WHEN 0 THEN 'off'
WHEN 1 THEN 'red' WHEN 2 THEN 'yellow' WHEN 3 THEN 'green' END,
@lastflash = CASE (CAST(:LastValue/16 AS INT) % 16) WHEN 6 THEN 'off' WHEN 0 THEN 'off'
WHEN 1 THEN 'no' WHEN 2 THEN 'slow' WHEN 3 THEN 'fast' END,
@lastsound = CAST(:LastValue/256 AS INT)

INSERT INTO oee_devicedata
(id, moduleid, moduleno, modulename, site,
  time, value, online, light, flash,
  sound, soundstate, volume, lastvalue, lastlight,
  lastflash, lastsound, lastsoundstate, lastvolume)
VALUES (NEWID(), :ModuleID, :ModuleNo, :ModuleName, :Site,
  GETDATE(), :DataValue, NULL, @light, @flash,
  @sound, NULL, NULL, :LastValue, @lastlight, @lastflash,
  @lastsound, NULL, NULL)

IF exists(SELECT 1 FROM oee_device WHERE ModuleNo = :ModuleNo)
  UPDATE oee_device set light = @light, flash = @flash, sound = @sound, updatetime = GETDATE() WHERE ModuleNo = :ModuleNo
ELSE
  INSERT INTO oee_device(id,moduleno,modulename,light,flash,sound,updatetime)
  VALUES(NEWID(),:ModuleNo,:ModuleName,@light,@flash,@sound,GETDATE())
2
3
4
5
6
7
8
9
10
11
12
13
14
15
16
17
18
19
20
21
22
23
24
25
26
27
28
29
30
31
32
33
34
设置设备的串口通讯连接信息,打开 TARS 监控,可查询到输出的数据。
# 2. 设计明细
开启Smart智慧控制平台,分别加入下插图之控件。或者通过点击菜单栏 [文件] - [打开项目] 选择项目打开该范例。
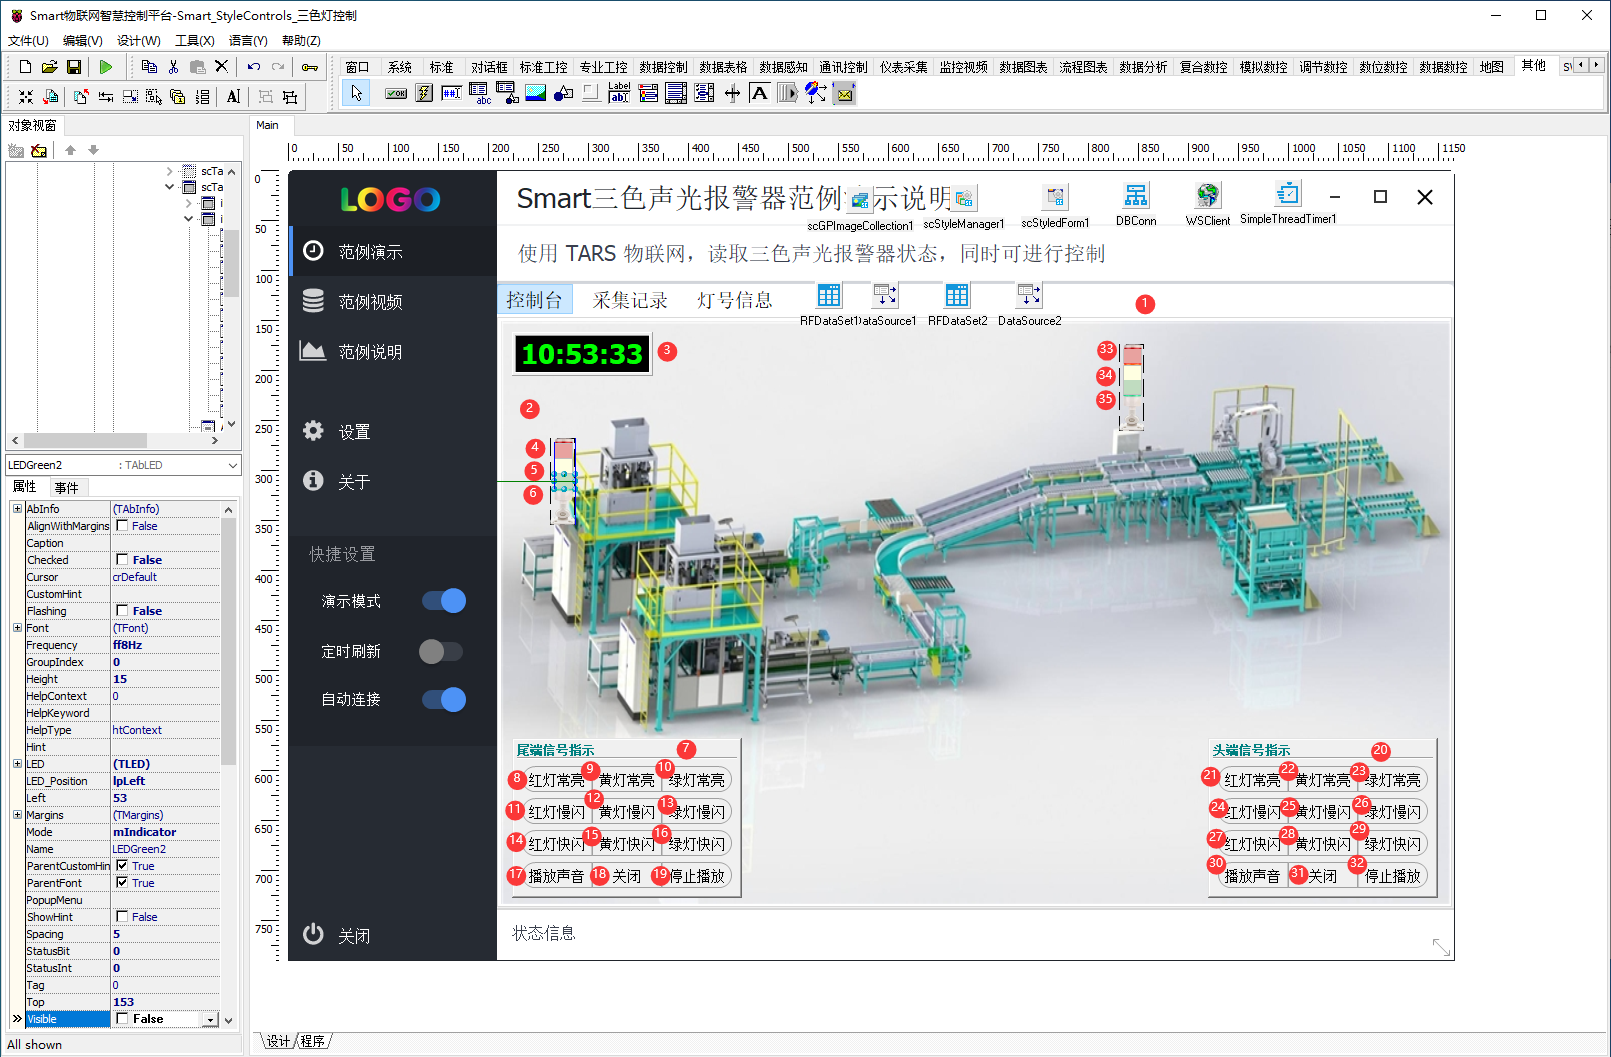
第一屏的功能控件说明如下:
- TscPageControl 组件,控件名称为
scPageControl1。其中创建了3个标签。 - TImage 组件,控件名称为
Image1。 - TAbClock 组件,控件名称为
AbClock1。 - TAbLED 组件,控件名称为
LEDRed1。 - TAbLED 组件,控件名称为
LEDYellow1。 - TAbLED 组件,控件名称为
LEDGreen1。 - TiPanel 组件,控件名称为
iPanel1。 - TscGPButton 组件,控件名称为
scGPButton117。 - TscGPButton 组件,控件名称为
scGPButton118。 - TscGPButton 组件,控件名称为
scGPButton119。 - TscGPButton 组件,控件名称为
scGPButton133。 - TscGPButton 组件,控件名称为
scGPButton134。 - TscGPButton 组件,控件名称为
scGPButton135。 - TscGPButton 组件,控件名称为
scGPButton149。 - TscGPButton 组件,控件名称为
scGPButton150。 - TscGPButton 组件,控件名称为
scGPButton151。 - TscGPButton 组件,控件名称为
scGPButton1Start。 - TscGPButton 组件,控件名称为
scGPButton196。 - TscGPButton 组件,控件名称为
scGPButton1Stop。 - TiPanel 组件,控件名称为
iPanel2。 - TscGPButton 组件,控件名称为
scGPButton217。 - TscGPButton 组件,控件名称为
scGPButton218。 - TscGPButton 组件,控件名称为
scGPButton219。 - TscGPButton 组件,控件名称为
scGPButton233。 - TscGPButton 组件,控件名称为
scGPButton234。 - TscGPButton 组件,控件名称为
scGPButton235。 - TscGPButton 组件,控件名称为
scGPButton249。 - TscGPButton 组件,控件名称为
scGPButton250。 - TscGPButton 组件,控件名称为
scGPButton251。 - TscGPButton 组件,控件名称为
scGPButton2Start。 - TscGPButton 组件,控件名称为
scGPButton296。 - TscGPButton 组件,控件名称为
scGPButton2Stop。 - TAbLED 组件,控件名称为
LEDRed2。 - TAbLED 组件,控件名称为
LEDYellow2。 - TAbLED 组件,控件名称为
LEDGreen2。
1:scPageControl1 属性设置
Align:设置对齐方式,设置为alClient。- 页面中需创建3个标签页,分别为
scTabSheet1、scTabSheet2、scTabSheet3。
3:AbClock1 属性设置
Font:设置显示的字体,设置字体大小Font.Size为 20。
4:LEDRed1 属性设置
Caption:设置显示的字幕,设置为空。LED:设置LED灯的相关属性。其中ColorOff设置为$009FA2E8,ColorOn设置为clRed,Height设置为12,Shape设置为sRectangle,Width设置为19。
5:LEDYellow1 属性设置
Caption:设置显示的字幕,设置为空。LED:设置LED灯的相关属性。其中ColorOff设置为clInfoBk,ColorOn设置为clYellow,Height设置为12,Shape设置为sRectangle,Width设置为19。
6:LEDGreen1 属性设置
Caption:设置显示的字幕,设置为空。LED:设置LED灯的相关属性。其中ColorOff设置为clMoneyGreen,ColorOn设置为clLime,Height设置为12,Shape设置为sRectangle,Width设置为19。
7:iPanel1 属性设置
TitleText:设置标签的标题,设置为头端信号指示。
8:scGPButton117 属性设置
Caption:设置按钮显示的文字,设置为红灯常亮。Options:设置按钮的属性,其中设置ShapeStyle为scgpSegmentedLeftRounded。
9:scGPButton118 属性设置
Caption:设置按钮显示的文字,设置为黄灯常亮。Options:设置按钮的属性,其中设置ShapeStyle为scgpRect。
10:scGPButton119 属性设置
Caption:设置按钮显示的文字,设置为绿灯常亮。Options:设置按钮的属性,其中设置ShapeStyle为scgpSegmentedRightRounded。
11:scGPButton133 属性设置
Caption:设置按钮显示的文字,设置为红灯慢闪。Options:设置按钮的属性,其中设置ShapeStyle为scgpSegmentedLeftRounded。
12:scGPButton134 属性设置
Caption:设置按钮显示的文字,设置为黄灯慢闪。Options:设置按钮的属性,其中设置ShapeStyle为scgpRect。
13:scGPButton135 属性设置
Caption:设置按钮显示的文字,设置为绿灯慢闪。Options:设置按钮的属性,其中设置ShapeStyle为scgpSegmentedRightRounded。
14:scGPButton149 属性设置
Caption:设置按钮显示的文字,设置为红灯快闪。Options:设置按钮的属性,其中设置ShapeStyle为scgpSegmentedLeftRounded。
15:scGPButton150 属性设置
Caption:设置按钮显示的文字,设置为黄灯快闪。Options:设置按钮的属性,其中设置ShapeStyle为scgpRect。
16:scGPButton151 属性设置
Caption:设置按钮显示的文字,设置为绿灯快闪。Options:设置按钮的属性,其中设置ShapeStyle为scgpSegmentedRightRounded。
17:scGPButton1Start 属性设置
Caption:设置按钮显示的文字,设置为播放声音。Options:设置按钮的属性,其中设置ShapeStyle为scgpSegmentedLeftRounded。
18:scGPButton196 属性设置
Caption:设置按钮显示的文字,设置为关闭。Options:设置按钮的属性,其中设置ShapeStyle为scgpRect。
19:scGPButton1Stop 属性设置
Caption:设置按钮显示的文字,设置为停止播放。Options:设置按钮的属性,其中设置ShapeStyle为scgpSegmentedRightRounded。
20:iPanel2 属性设置
TitleText:设置标签的标题,设置为尾端信号指示。
21:scGPButton217 属性设置
Caption:设置按钮显示的文字,设置为红灯常亮。Options:设置按钮的属性,其中设置ShapeStyle为scgpSegmentedLeftRounded。
22:scGPButton218 属性设置
Caption:设置按钮显示的文字,设置为黄灯常亮。Options:设置按钮的属性,其中设置ShapeStyle为scgpRect。
23:scGPButton219 属性设置
Caption:设置按钮显示的文字,设置为绿灯常亮。Options:设置按钮的属性,其中设置ShapeStyle为scgpSegmentedRightRounded。
24:scGPButton233 属性设置
Caption:设置按钮显示的文字,设置为红灯慢闪。Options:设置按钮的属性,其中设置ShapeStyle为scgpSegmentedLeftRounded。
25:scGPButton234 属性设置
Caption:设置按钮显示的文字,设置为黄灯慢闪。Options:设置按钮的属性,其中设置ShapeStyle为scgpRect。
26:scGPButton235 属性设置
Caption:设置按钮显示的文字,设置为绿灯慢闪。Options:设置按钮的属性,其中设置ShapeStyle为scgpSegmentedRightRounded。
27:scGPButton249 属性设置
Caption:设置按钮显示的文字,设置为红灯快闪。Options:设置按钮的属性,其中设置ShapeStyle为scgpSegmentedLeftRounded。
28:scGPButton250 属性设置
Caption:设置按钮显示的文字,设置为黄灯快闪。Options:设置按钮的属性,其中设置ShapeStyle为scgpRect。
29:scGPButton251 属性设置
Caption:设置按钮显示的文字,设置为绿灯快闪。Options:设置按钮的属性,其中设置ShapeStyle为scgpSegmentedRightRounded。
30:scGPButton2Start 属性设置
Caption:设置按钮显示的文字,设置为播放声音。Options:设置按钮的属性,其中设置ShapeStyle为scgpSegmentedLeftRounded。
31:scGPButton296 属性设置
Caption:设置按钮显示的文字,设置为关闭。Options:设置按钮的属性,其中设置ShapeStyle为scgpRect。
32:scGPButton2Stop 属性设置
Caption:设置按钮显示的文字,设置为停止播放。Options:设置按钮的属性,其中设置ShapeStyle为scgpSegmentedRightRounded。
33:LEDRed3 属性设置
Caption:设置显示的字幕,设置为空。LED:设置LED灯的相关属性。其中ColorOff设置为$009FA2E8,ColorOn设置为clRed,Height设置为12,Shape设置为sRectangle,Width设置为19。
34:LEDYellow2 属性设置
Caption:设置显示的字幕,设置为空。LED:设置LED灯的相关属性。其中ColorOff设置为clInfoBk,ColorOn设置为clYellow,Height设置为12,Shape设置为sRectangle,Width设置为19。
35:LEDGreen2 属性设置
Caption:设置显示的字幕,设置为空。LED:设置LED灯的相关属性。其中ColorOff设置为clMoneyGreen,ColorOn设置为clLime,Height设置为12,Shape设置为sRectangle,Width设置为19。
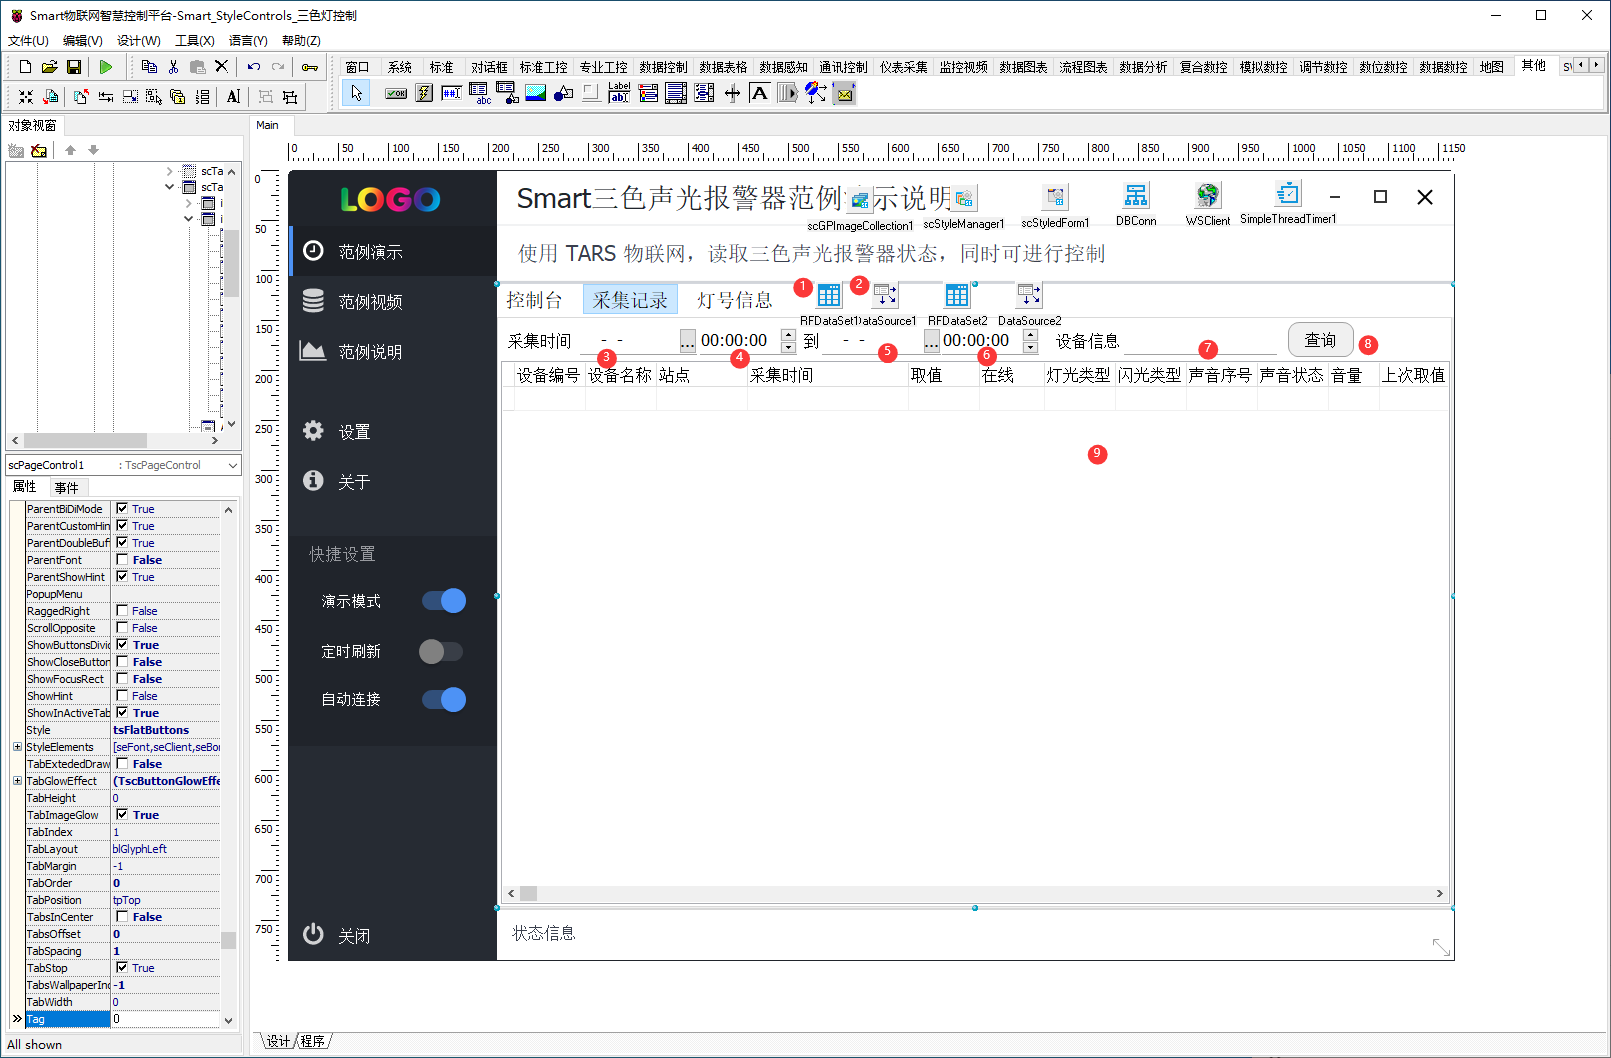
第二屏的功能说明如下:
- TRFDataSet 组件,控件名称为
RFDataSet1。 - TDataSource 组件,控件名称为
DataSource1。 - TscDateEdit 组件,控件名称为
scDateEdit1。 - TscTimeEdit 组件,控件名称为
scTimeEdit1。 - TscDateEdit 组件,控件名称为
scDateEdit1。 - TscTimeEdit 组件,控件名称为
scTimeEdit1。 - TscEdit 组件,控件名称为
scEdit1。 - TscGPButton 组件,控件名称为
btnQuery。 - TDBGrid 组件,控件名称为
DBGrid1。
2:DataSource1 属性设置
DataSet:设置绑定的数据集,设置为RFDataSet1。
3:scDateEdit1 属性设置
BorderKind:设置控件的边界类型,设置为scebBottomLine。
4:scTimeEdit1 属性设置
BorderKind:设置控件的边界类型,设置为scebBottomLine。
5:scDateEdit2 属性设置
BorderKind:设置控件的边界类型,设置为scebBottomLine。
6:scTimeEdit2 属性设置
BorderKind:设置控件的边界类型,设置为scebBottomLine。
7:scEdit1 属性设置
BorderKind:设置控件的边界类型,设置为scebBottomLine。
8:btnQuery 属性设置
Caption:设置按钮显示的字幕,设置为查询。Options:设置按钮的选项,其中设置ShapeStyle为scgpRoundedRect。
9:DBGrid1 属性设置
DataSource:设置绑定的数据源,设置为DataSource1。Columns:设置表中显示的列。设置项如下:
| 字段名称 | 显示名称 | 宽度 |
|---|---|---|
| moduleno | 设备编号 | 70 |
| modulename | 设备名称 | 70 |
| site | 站点 | 90 |
| time | 采集时间 | 160 |
| value | 取值 | 70 |
| online | 在线 | 64 |
| light | 灯光类型 | 70 |
| flash | 闪光类型 | 70 |
| sound | 声音序号 | 70 |
| soundstate | 声音状态 | 70 |
| volume | 音量 | 50 |
| lastvalue | 上次取值 | 70 |
| lastlight | 上次灯光类型 | 64 |
| lastflash | 上次闪光类型 | 64 |
| lastsound | 上次声音序号 | 64 |
| lastsoundstate | 上次声音状态 | 64 |
| lastvolume | 上次音量 | 70 |
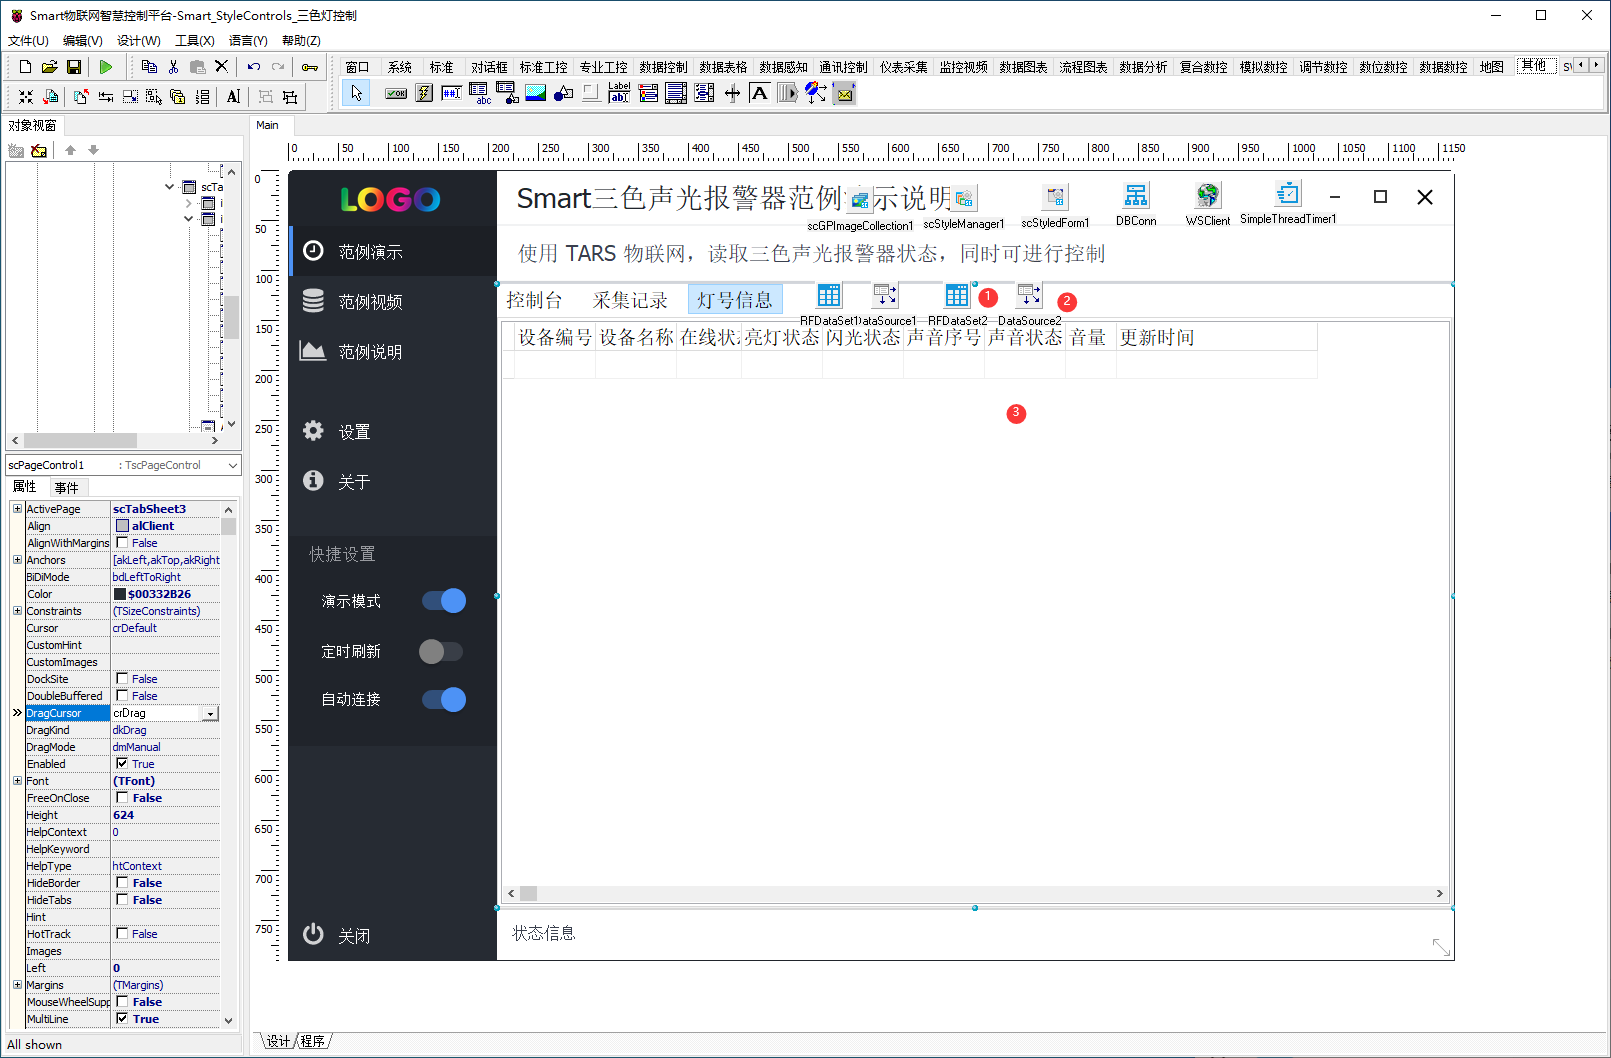
第三屏的功能说明如下:
- TRFDataSet 组件,控件名称为
RFDataSet2。 - TDataSource 组件,控件名称为
DataSource2。 - TDBGrid 组件,控件名称为
DBGrid2。
2:DataSource2 属性设置
DataSet:设置绑定的数据集,设置为RFDataSet2。
9:DBGrid2 属性设置
DataSource:设置绑定的数据源,设置为DataSource2。Columns:设置表中显示的列。设置项如下:
| 字段名称 | 显示名称 | 宽度 |
|---|---|---|
| moduleno | 设备编号 | 70 |
| modulename | 设备名称 | 70 |
| online | 在线 | 64 |
| light | 灯光类型 | 70 |
| flash | 闪光类型 | 70 |
| sound | 声音序号 | 70 |
| soundstate | 声音状态 | 70 |
| volume | 音量 | 50 |
| updatetime | 更新时间 | 200 |
# 3. 程序设计
# 3.1. 程序初始设置
创建自定程序。用于快捷设置灯状态。
procedure TMyHandler.SetLight(ANum: String; ALED:TAbLED);
begin
  ALED.Visible := True;
  if StrToInt(ANum) div 16 = 1 then
  begin
    ALED.Checked := True;
    ALED.Flashing := False;
    ALED.Frequency := ff1Hz;
  end;
  if StrToInt(ANum) div 16 = 2 then
  begin
    ALED.Checked := True;
    ALED.Flashing := True;
    ALED.Frequency := ff1Hz;
  end;
  if StrToInt(ANum) div 16 = 3 then
  begin
    ALED.Checked := True;
    ALED.Flashing := True;
    ALED.Frequency := ff8Hz;
  end;
  if (StrToInt(ANum) div 16 = 6) or (StrToInt(ANum) div 16 = 0) then
  begin
    ALED.Checked := False;
    ALED.Flashing := False;
    ALED.Frequency := ff1Hz;
  end;
end;

procedure TMyHandler.Process1(s: String);
begin
  if StrToInt(s) mod 16 = 1 then
  begin
    SetLight(s,FThis.LEDRed1);
    FThis.LEDYellow1.Visible := False;
    FThis.LEDYellow1.Checked := False;
    FThis.LEDGreen1.Visible := False;
    FThis.LEDGreen1.Checked := False;
  end
  else if StrToInt(s) mod 16 = 2 then
  begin
    FThis.LEDRed1.Visible := False;
    FThis.LEDRed1.Checked := False;
    SetLight(s,FThis.LEDYellow1);
    FThis.LEDGreen1.Visible := False;
    FThis.LEDGreen1.Checked := False;
  end
  else if StrToInt(s) mod 16 = 3 then
  begin
    FThis.LEDRed1.Visible := False;
    FThis.LEDRed1.Checked := False;
    FThis.LEDYellow1.Checked := False;
    FThis.LEDYellow1.Checked := False;
    SetLight(s,FThis.LEDGreen1);
  end
  else
  begin
    FThis.LEDRed1.Visible := False;
    FThis.LEDRed1.Checked := False;
    FThis.LEDYellow1.Checked := False;
    FThis.LEDYellow1.Checked := False;
    FThis.LEDGreen1.Visible := False;
    FThis.LEDGreen1.Checked := False;
  end;
end;

procedure TMyHandler.Process2(s: String);
begin
  if StrToInt(s) mod 16 = 1 then
  begin
    SetLight(s,FThis.LEDRed2);
    FThis.LEDYellow2.Visible := False;
    FThis.LEDYellow2.Checked := False;
    FThis.LEDGreen2.Visible := False;
    FThis.LEDGreen2.Checked := False;
  end
  else if StrToInt(s) mod 16 = 2 then
  begin
    FThis.LEDRed2.Visible := False;
    FThis.LEDRed2.Checked := False;
    SetLight(s,FThis.LEDYellow2);
    FThis.LEDGreen2.Visible := False;
    FThis.LEDGreen2.Checked := False;
  end
  else if StrToInt(s) mod 16 = 3 then
  begin
    FThis.LEDRed2.Visible := False;
    FThis.LEDRed2.Checked := False;
    FThis.LEDYellow2.Checked := False;
    FThis.LEDYellow2.Checked := False;
    SetLight(s,FThis.LEDGreen2);
  end
  else
  begin
    FThis.LEDRed2.Visible := False;
    FThis.LEDRed2.Checked := False;
    FThis.LEDYellow2.Checked := False;
    FThis.LEDYellow2.Checked := False;
    FThis.LEDGreen2.Visible := False;
    FThis.LEDGreen2.Checked := False;
  end;
end;
2
3
4
5
6
7
8
9
10
11
12
13
14
15
16
17
18
19
20
21
22
23
24
25
26
27
28
29
30
31
32
33
34
35
36
37
38
39
40
41
42
43
44
45
46
47
48
49
50
51
52
53
54
55
56
57
58
59
60
61
62
63
64
65
66
67
68
69
70
71
72
73
74
75
76
77
78
79
80
81
82
83
84
85
86
87
88
89
90
91
92
93
94
95
96
97
98
99
100
101
102
# 3.2. 事件设置
- scGPButton OnClick事件
设置按钮的点击事件。适用于灯状态变化时的事件。呼叫 TARS 控制灯状态变化,同时控制界面中显示的值状态变化。
procedure TMyHandler.scGPButtonClick;
var
  id,id1,id2: String;
begin
  if FThis.scMode.State = scswOn then exit;
  id := RightStr(TscGPButton(Sender).Name,3);
  id1 := LeftStr(id,2);
  id2 := RightStr(id,2);
  if id1 = '1' then
  begin
    paxfunc.NetHttpGet('http://127.0.0.1:8809/rest/iot/setmodbusvalue?moduleno=015-wledstate&value=' + id2,'');
    Process1(id2);
  end;
  if id1 = '2' then
  begin
    paxfunc.NetHttpGet('http://127.0.0.1:8809/rest/iot/setmodbusvalue?moduleno=016-wledstate&value=' + id2,'');
    Process2(id2);
  end;
end;
2
3
4
5
6
7
8
9
10
11
12
13
14
15
16
17
18
19
- SimpleThreadTimer1-OnTimer 事件
设置要重复使用的事件。
procedure TMyHandler.SimpleThreadTimer1Timer;
var
  s: String;
  vJSON: TJSONValue;
begin
  if FThis.scMode.State = scswOn then exit;
  btnQueryClick(Sender);
  FThis.RFDataSet2.Close;
  FThis.RFDataSet2.Open;
  s := paxfunc.NetHttpGet('http://127.0.0.1:8809/rest/iot/getiotvalue?moduleno=015-rledstate','');
  vJSON := paxfunc.ParseJSONValue(s);
  s := paxfunc.GetJSONString(vJSON,'message');
  Process1(s);
  s := paxfunc.NetHttpGet('http://127.0.0.1:8809/rest/iot/getiotvalue?moduleno=016-rledstate','');
  vJSON := paxfunc.ParseJSONValue(s);
  s := paxfunc.GetJSONString(vJSON,'message');
  Process2(s);
end;
2
3
4
5
6
7
8
9
10
11
12
13
14
15
16
17
18
- scGPButton1Start - OnClick事件 scGPButton2Start - OnClick事件
点击播放声音按钮,开始播放声音。
//播放声音
procedure TMyHandler.scGPButton1StartClick;
begin
  if FThis.scMode.State = scswOn then exit;
  paxfunc.NetHttpGet('http://127.0.0.1:8809/rest/iot/setmodbusvalue?moduleno=015-wplayrepeat&value=1','');
end;

procedure TMyHandler.scGPButton2StartClick;
begin
  if FThis.scMode.State = scswOn then exit;
  paxfunc.NetHttpGet('http://127.0.0.1:8809/rest/iot/setmodbusvalue?moduleno=016-wplayrepeat&value=1','');
end;
2
3
4
5
6
7
8
9
10
11
12
- scGPButton1Stop - OnClick事件 scGPButton2Stop - OnClick事件
点击停止播放按钮,停止播放声音。
//停止播放
procedure TMyHandler.scGPButton1StopClick;
begin
  if FThis.scMode.State = scswOn then exit;
  paxfunc.NetHttpGet('http://127.0.0.1:8809/rest/iot/setmodbusvalue?moduleno=015-wstopplay&value=1','');
end;

procedure TMyHandler.scGPButton2StopClick;
begin
  if FThis.scMode.State = scswOn then exit;
  paxfunc.NetHttpGet('http://127.0.0.1:8809/rest/iot/setmodbusvalue?moduleno=016-wstopplay&value=1','');
end;
2
3
4
5
6
7
8
9
10
11
12
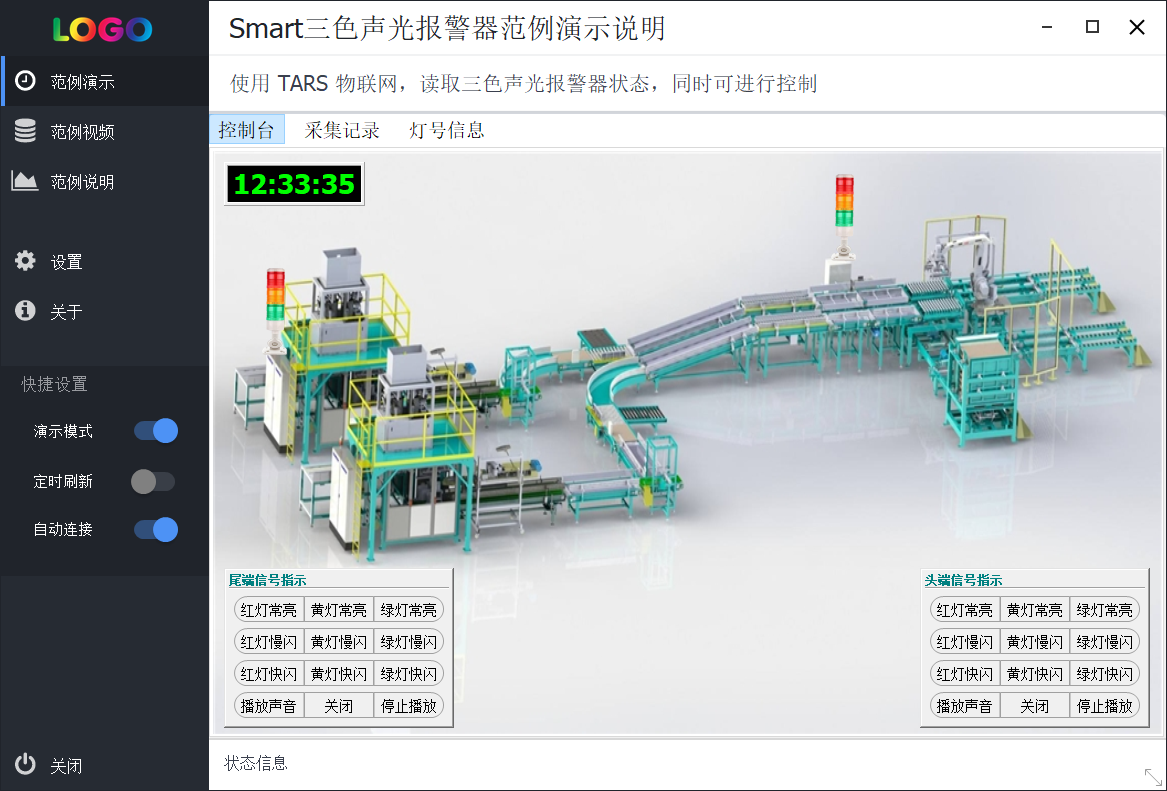
# 4. 运行结果
使用鼠标点击工具栏运行(Run),测试运行结果。
通过工具栏保存,将程序保存为 sdb 项目文件。
运行后,启用 TARS 的物联网监控功能,在 Smart 控制界面可查看当前设备灯的运行情况,下方可使用按钮对声光报警器进行控制。