 RestAPI读取温湿度
# Smart之RestAPI读取温湿度
# 1. 说明
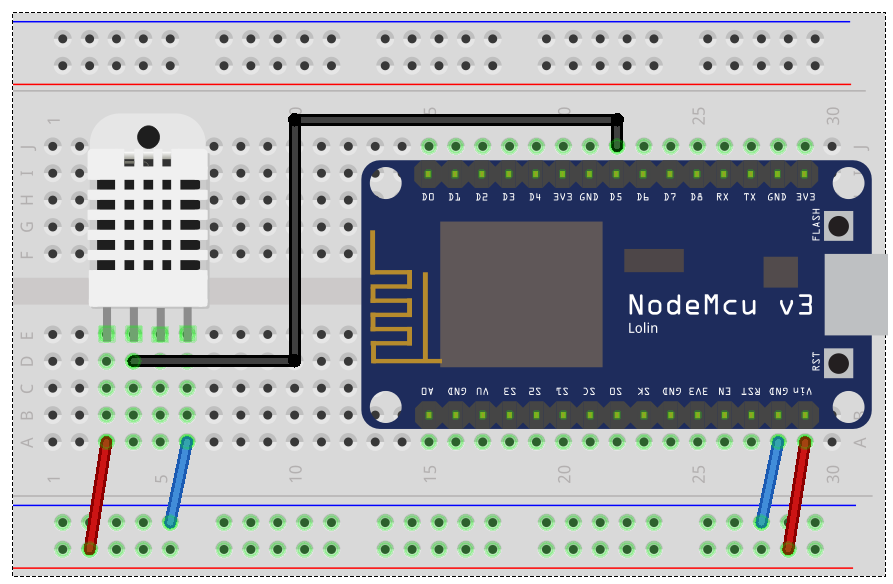
范例采用RestAPI通讯,来读取连接到NodeMCU的DHT22温湿度传感器的数据。NodeMCU是以ESP8266(ESP12)晶片为基础,包含了WiFi,GPIO,PWM,ADC,I2C等功能的主控板,执行效率高,非常适合物联网应用开发,因为它内建了WiFi功能,与Arduino相容,Arduino中可用的传感器基本都可用于NodeMCU。范例中使用的DHT22传感器正极(长脚)连接接至NodeMCU Vin针脚,负极连接至NodeMCU GND针脚,信号针脚连接至NodeMCU D5针脚。
范例中使用的NodeMCU的ESP8266无线网络,先从路由器获取IP,连接网络成功后,启动Rest服务,通过访问对应的地址获取温湿度数据。
通过范例学习,可以掌握Rest通讯的基本通讯原理,并结合NodeMCU开发板进行LED的控制功能。
# 2. 零件连接图

# 3. 使用零件
| 序 | 零件名称 | 数量 |
|---|---|---|
| 1 | NodeMCU开发板 | 1 |
| 2 | USB数据线 | 1 |
| 3 | 面包板 | 1 |
| 4 | 杜邦线 | 若干 |
| 6 | DHT22温湿度传感器 | 1 |
# 4. Arduino流程图

# 5. Arduino程序
使用Arduino IDE 编译并上传以下Arduino程序。
// 使用 NodeMCU 开发板
// aREST
//https://github.com/marcoschwartz/aREST
//aRESTUI
//https://github.com/marcoschwartz/aREST_UI
//DHT Library
//https://github.com/adafruit/DHT-sensor-library

#include <ESP8266WiFi.h>
#include <aREST.h>
#include <aREST_UI.h>
#include <DHT.h>

#define DHT_PIN 14   //定义LED针脚D5
#define DHTTYPE DHT22 // 定义温湿度传感器类型 DHT22
DHT dht(DHT_PIN, DHTTYPE);//初始化传感器

// 创建aREST实例
aREST_UI rest = aREST_UI();

// WiFi连接参数
const char* ssid = "WIFI_SSID";
const char* password = "WIFI_PASSWORD";

// 监听TCP连接
#define LISTEN_PORT           80

// 创建WiFi服务器
WiFiServer server(LISTEN_PORT);

// 定义传递给API的变量
float temperature;
float humidity;

void setup(void) {
  // 开启串口
  Serial.begin(9600);

  // 设定标题
  rest.title("aREST DHT Sensor");

  // 初始化 DHT
  dht.begin();

  // 初始化变量,并将其传递给REST API
  rest.variable("temperature", &temperature);
  rest.variable("humidity", &humidity);

  // 设定标签
  rest.label("temperature");
  rest.label("humidity");

  // Give name and ID to device
  rest.set_id("1");
  rest.set_name("esp8266");

  // 给设备定义ID与名称
  rest.set_id("1");
  rest.set_name("esp8266");


   //指定IP位址,请自行在此加入WiFi.config()叙述。
   WiFi.config(IPAddress(192,168,0,171),           // IP地址
               IPAddress(192,168,0,1),             // 网关地址
               IPAddress(255,255,255,0));          // 子网掩码
  WiFi.begin(ssid, password);
  while (WiFi.status() != WL_CONNECTED) {
    delay(500);
    Serial.print(".");
  }
  Serial.println("");
  Serial.println("WiFi connected");

  // 启动服务器
  server.begin();
  Serial.println("Server started");

  // 输出IP地址
  Serial.println(WiFi.localIP());
}

void loop() {
  //读取温湿度
  humidity = dht.readHumidity();
  temperature = dht.readTemperature();
  // 响应aREST
  WiFiClient client = server.available();
  if (!client) {
    return;
  }
  while (!client.available()) {
    delay(1);
  }
  rest.handle(client);
}
2
3
4
5
6
7
8
9
10
11
12
13
14
15
16
17
18
19
20
21
22
23
24
25
26
27
28
29
30
31
32
33
34
35
36
37
38
39
40
41
42
43
44
45
46
47
48
49
50
51
52
53
54
55
56
57
58
59
60
61
62
63
64
65
66
67
68
69
70
71
72
73
74
75
76
77
78
79
80
81
82
83
84
85
86
87
88
89
90
91
92
93
94
95
# 6. 设计明细
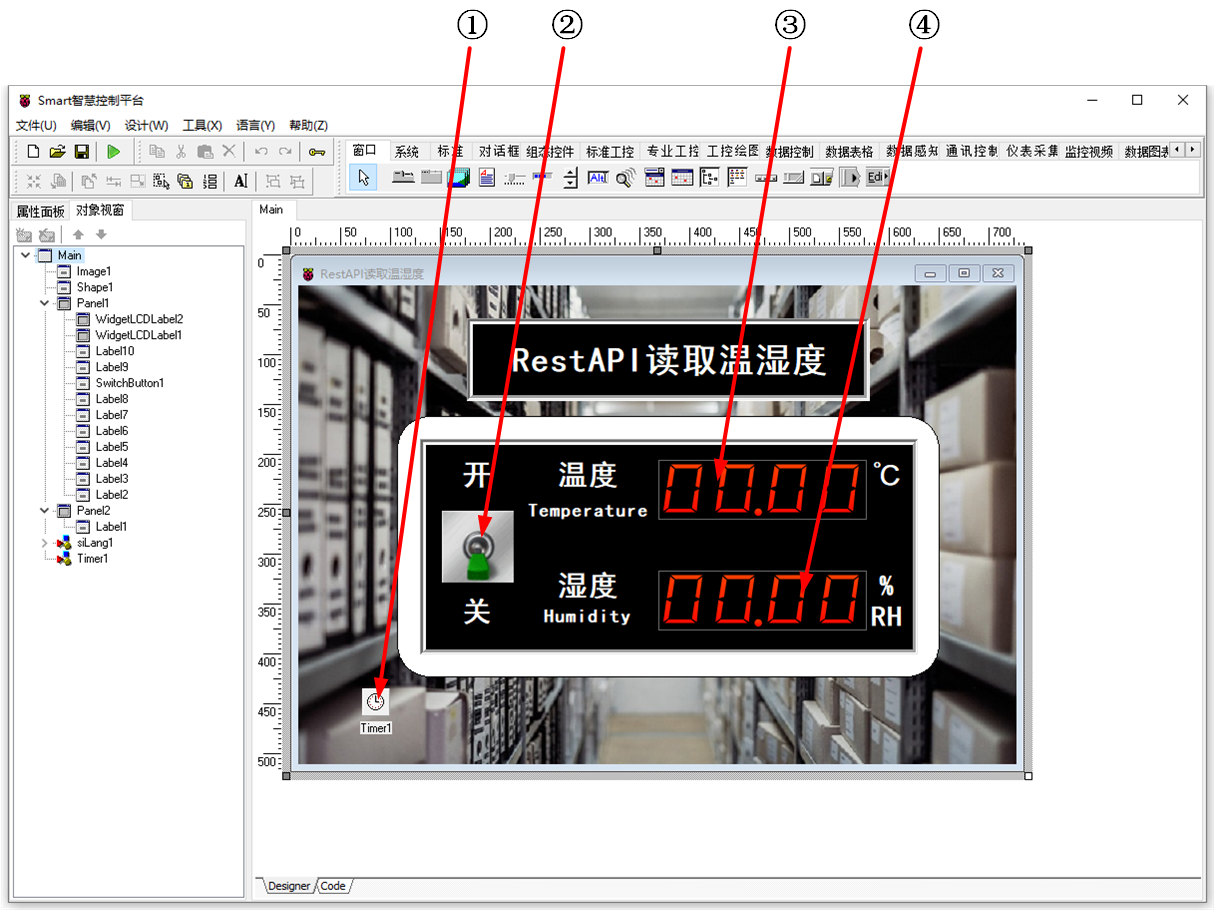
开启Smart智慧控制平台,分别加入下插图之控件。或者通过点击菜单栏[文件]-[打开项目]选择项目打开该范例。

①:TTimer组件,控件名称为Timer1。
②:TSwitchButton组件,控件名称为SwitchButton1。
③:TWidgetLCDLabel组件,控件名称为WidgetLCDLabel1。
④:TWidgetLCDLabel组件,控件名称为WidgetLCDLabel2。
Main窗体属性设置
Caption:主窗体标题,设置为RestAPI读取温湿度。ClientHeight:窗体客户区高度=480。ClientWidth:窗体客户区宽度=720。
①Timer1属性设置
Enabled:设置是否启用计时器,设置为False。Interval:设置时间间隔,设置为2000。
②SwitchButton1属性设置
Height:设置图片高度=72。Width:设置图片宽度=72。SwitchOff:设置当IsChecked属性为False时显示的图片,点击属性右侧的[...]按钮,打开文件上传界面,点击[Load...]从文件浏览器中选择对应的图片文件上传,返回该界面下,待显示出图片后点击[OK]加载图片。
SwitchOn:设置当IsChecked属性为True时显示的图片,点击属性右侧的[...]按钮,打开文件上传界面,点击[Load...]从文件浏览器中选择对应的图片文件上传,返回该界面下,待显示出图片后点击[OK]加载图片。
③WidgetLCDLabel1属性设置
Caption.Format:显示格式,设置为00.00。Height:设置控件高度=60。Width:设置控件宽度=209。
④WidgetLCDLabel2属性设置
Caption.Format:显示格式,设置为00.00。Height:设置控件高度=60。Width:设置控件宽度=209。
# 7. 程序设计
# 7.1. 程序初始设置
该程序无初始设置。
# 7.2. 事件设置
- ①Timer1-OnTimer事件
点击以开启计时器功能,获取DHT22数值并显示。
procedure TMyHandler.Timer1Timer;
var
  hum: String;
  tmp: String;
  JSONStringHUM : String;
  JSONStringTMP : String;
  J : TJSONObject;
  ValueHUM : TJSONValue;
  ValueTMP : TJSONValue;
Begin
  J := TJSONObject.Create;
  Try
    JSONStringTMP := paxfunc.UrlDecode(paxfunc.NetHttpGet('http://192.168.0.171/temperature'));
    JSONStringHUM := paxfunc.UrlDecode(paxfunc.NetHttpGet('http://192.168.0.171/humidity'));
    ValueTMP := paxfunc.ParseJSONObject(JSONStringTMP);
    ValueHUM := paxfunc.ParseJSONObject(JSONStringHUM);
    FThis.WidgetLCDLabel1.Caption.Value := StrToFloat(TJSONObject(ValueTMP).Get(0).JsonValue.Value);
    FThis.WidgetLCDLabel2.Caption.Value := StrToFloat(TJSONObject(ValueHUM).Get(0).JsonValue.Value);
  Finally
    J.Free;
  end;
End;
2
3
4
5
6
7
8
9
10
11
12
13
14
15
16
17
18
19
20
21
22
- ②SwitchButton1-OnSwitch事件
点击开关以开启/关闭计时器功能。
procedure TMyHandler.SwitchButton1Switch;
begin
  FThis.Timer1.Enabled := FThis.SwitchButton1.IsChecked;
  if FThis.SwitchButton1.IsChecked = False then
  begin
    FThis.WidgetLCDLabel1.Caption.Value := 0;
    FThis.WidgetLCDLabel2.Caption.Value := 0
  end;
end;
2
3
4
5
6
7
8
9
# 8. 运行结果
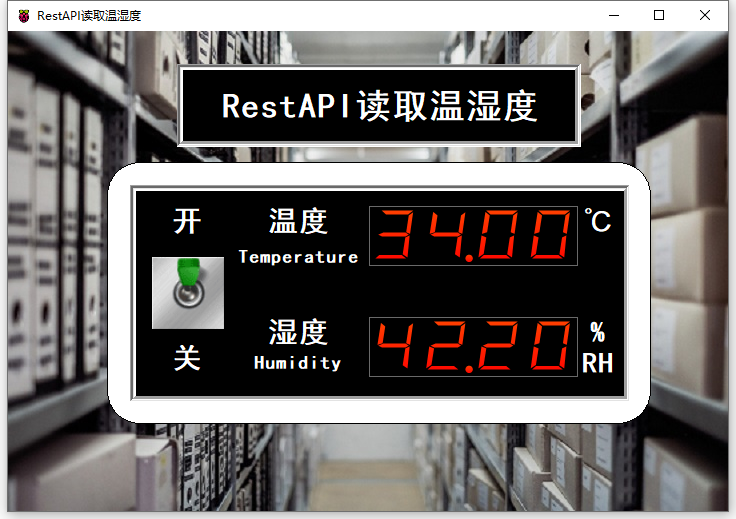
通过工具栏保存,将程序保存为 sdb 项目文件。
使用鼠标点击工具栏运行(Run),测试运行结果。将图中的拨杆拨向“开”,数值显示屏中的温湿度数据每隔五秒更新一次。

