 ModbusRTU读取温湿度
# PinToo之ModbusRTU读取温湿度
# 1. 说明
范例采用ModbusRTU通讯协议,读取驳接在Arduino上的DHT22温湿度传感器数据。ModbusRTU传输方式为1个主机对应多个从机,此时使用从机的从机号来做识别,如果主机传输的从机号对应到该从机的号码,如果格式正确该从机会作回应。因此在Modbus传输中,每个从机都是被动的,在运行过程中会不断监听是否有收到请求。范例中的Arduino ModbusRTU设置为从机,等待主机发出指令进行各种控制活动。每个从机都有固定的保持寄存器的地址,需参照规范来进行存取。范例中也设置从机号与控制参数的地址。
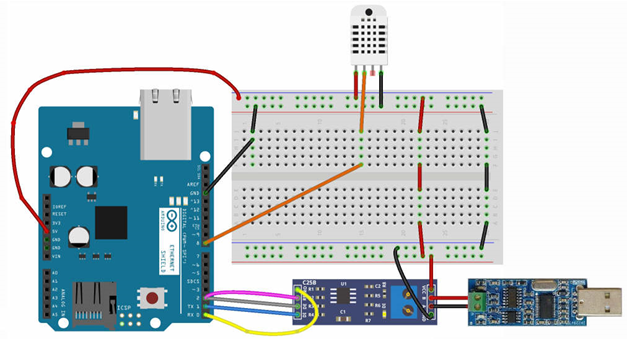
范例中使用TTL转RS-485模块(简称为TTL485)作为数据传输转换的装置,用于PC设备与Modbus RTU设备间的数据传输,单条485总线可以支持32个ModbusRTU设备。范例中采用TTL485扩展Arduino开发板在ModbusRTU的功能。TTL485与Arduino开发板的连接方式如下:
| TTL485针脚 | Arduino针脚 | 功能 |
|---|---|---|
| RO | RX | 接受信息 |
| RE | D2 | 收发控制 |
| DE | D2 | 收发控制 |
| DI | TX | 发送信息 |
| VCC | 5V | 供电 |
| GND | GND | 接地线 |
通过范例学习,可以掌握fxUsbSerial控件的属性设置和方法的使用,并结合arduino开发板进行DHT22温湿度传感器的数据采集。
# 2. 零件连接图
# 3. 使用零件
| 序 | 零件名称 | 数量 |
|---|---|---|
| 1 | Arduino UNO R3 开发板 | 1 |
| 2 | ProtoShield 原型扩展板 含mini面包板 | 1 |
| 3 | TTL转RS-485模块 | 1 |
| 4 | DHT22温湿度模块 | 1 |
| 5 | USB转485模块 | 1 |
| 6 | USB数据线 | 1 |
| 7 | 面包线 | 若干 |
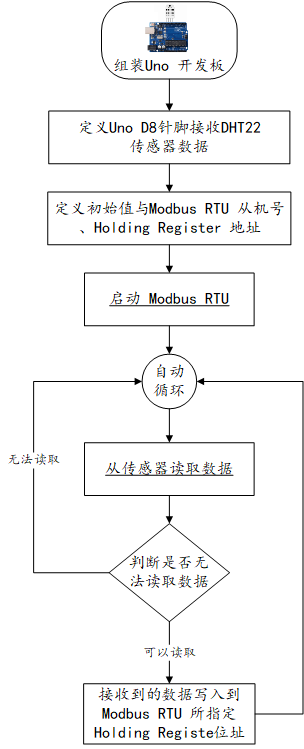
# 4. Arduino流程图
# 5. Arduino程序
使用Arduino IDE 编译并上传以下Arduino程序。
// 使用温湿度传感器之链接库 https://github.com/adafruit/DHT-sensor-library
// 使用链接库 https://drive.google.com/file/d/0Bx5wWRfN_z7oMDlZMDhWbXM2VFU/view
// 使用扩充模块 Arduino Sensor Shield 传感器扩展板 V5 XBee RS485
// 读取温湿度 因为modbus 无法传递小数字 所以先乘100 到客户端取用时要除 100
#include <modbus.h>
#include <modbusDevice.h>
#include <modbusRegBank.h>
#include <modbusSlave.h>
#include <DHT.h>
#define dhtPin 8 //读取DHT22 Data
#define dhtType DHT22 //选用DHT22
DHT dht(dhtPin, dhtType); // Initialize DHT sensor
modbusDevice regBank; // 宣告 Modbus
modbusSlave slave;
#define RS485TxEnablePin 2
#define RS485Baud 9600
#define RS485Format SERIAL_8N1
void setup() {
dht.begin();//启动DHT
regBank.setId(2); // 设置 Modus 从机号=2
regBank.add(40001); // 设置会使用到之 Holding Register 之地址
regBank.add(40002);
slave._device = ®Bank; // 启动 modbus RTU
slave.setBaud(&Serial,RS485Baud,RS485Format,RS485TxEnablePin);
}
void loop() {
float h = dht.readHumidity()*100; //读取湿度 因为modbus 无法传递小数字 所以先乘100 到客户端取用时要除 100
float t = dht.readTemperature()*100; //读取摄氏温度
if (isnan(h) || isnan(t)) {
Serial.println("无法从DHT传感器读取!");
return;
}
regBank.set(40001,t); // 地址 1 存放所测得之温度
regBank.set(40002,h); // 地址 2 放所测得之湿度
slave.run();
delay(500);
}
2
3
4
5
6
7
8
9
10
11
12
13
14
15
16
17
18
19
20
21
22
23
24
25
26
27
28
29
30
31
32
33
34
35
36
37
38
39
40
41
42
43
44
45
# 6. 设计明细
开启PinToo设计器,分别加入下插图之控件。或者点击左上角的[打开模板Lib文件]选择模板文件来打开对应模板。
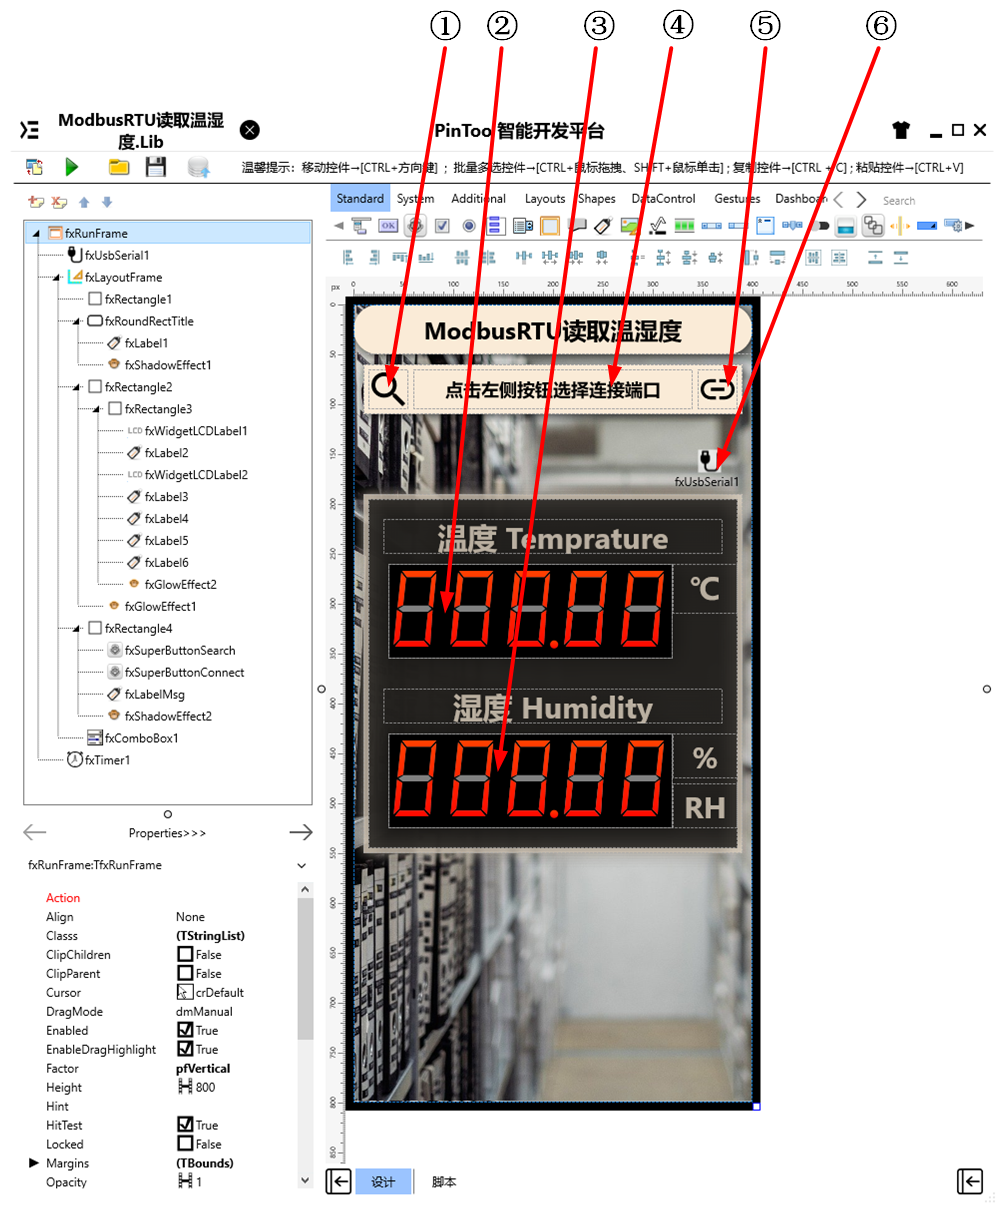
①:TfxSuperButton组件,控件名称为fxSuperButtonSearch。
②:TfxWidgetLCDLabel组件,控件名称为fxWidgetLCDLabel1。
③:TfxWidgetLCDLabel组件,控件名称为fxWidgetLCDLabel2。
④:TfxLabel组件,控件名称为fxLabelMsg。
⑤:TfxSuperButton组件,控件名称为fxSuperButtonConnect。
⑥:TfxUsbSerial组件,控件名称为fxUsbSerial1。
fxRunFrame属性设置
Height:设置页面高度=800。Width:设置页面宽度=400。
fxTimer1属性设置
Interval:设置计时器触发的时间间隔,单位为ms,设置为5000。Enabled:设置是否启用,设置为False。
fxComboBox1属性设置
Visible:设置控件是否可见,设置为False。
①fxSuperButtonSearch属性设置
Height:设置控件高度=40。Width:设置控件宽度=40。ButtonType:设置按钮类型,设置为TfxSvgButton。Name:设置控件名称=fxSuperButtonSearch。ButtonType.SvgData:设置SVG数据,其数据内容如下。
<path d="M27.3009262084961,24.3846530914307 L25.7649688720703,24.3846530914307 L25.2202167510986,23.8603782653809 C27.1248054504395,21.6445026397705 28.2716579437256,18.7691841125488 28.2716579437256,15.6358289718628 C28.2716579437256,8.65642738342285 22.6152267456055,3 15.6358289718628,3 C8.65642929077148,3 3,8.65642642974854 3,15.6358289718628 C3,22.6152286529541 8.65642738342285,28.2716579437256 15.6358289718628,28.2716579437256 C18.7650909423828,28.2716579437256 21.6404075622559,27.1248054504395 23.8603782653809,25.2202167510986 L24.3846530914307,25.7649688720703 L24.3846530914307,27.3009262084961 L34.1042022705078,37 L37,34.1042022705078 L27.3009262084961,24.3846530914307 Z M15.6358289718628,24.3846530914307 C10.7944831848145,24.3846530914307 6.88700199127197,20.4771690368652 6.88700199127197,15.6358270645142 C6.88700199127197,10.7944822311401 10.7944831848145,6.88700103759766 15.6358289718628,6.88700103759766 C20.4771728515625,6.88700103759766 24.3846549987793,10.7944822311401 24.3846549987793,15.6358289718628 C24.3846549987793,20.4771728515625 20.4771728515625,24.3846549987793 15.6358299255371,24.3846549987793 Z" p-id="2128" fill="Black" stroke="Null"></path>1②fxWidgetLCDLabel1属性设置
Height:设置控件高度=95。Width:设置控件宽度=285。Color:设置背景颜色=Black。
③fxWidgetLCDLabel2属性设置
Height:设置控件高度=95。Width:设置控件宽度=285。Color:设置背景颜色=Black。
④fxLabelMsg属性设置
Height:设置控件高度=40。Width:设置控件宽度=280。Text:设置标签文本=点击左侧按钮选择连接端口。Name:设置控件名称=fxLabelMsg。TextSettings.Font:设置字体大小及颜色。Size=18,Style中将fsBold勾选。使用该属性需将StyledSettings中的所有设定为True的选项的勾去除。
⑤fxSuperButtonConnect属性设置
Height:设置控件高度=40。Width:设置控件宽度=40。ButtonType:设置按钮类型,设置为TfxSvgButton。Name:设置控件名称=fxSuperButtonSearch。ButtonType.SvgData:设置SVG数据,其数据内容如下。
<path d="M13.2001752853394,21.7010040283203 L26.7997760772705,21.7010040283203 L26.7997760772705,18.301628112793 L13.2001752853394,18.301628112793 L13.2001752853394,21.7010040283203 Z M6.22977828979492,20 C6.22977828979492,16.0902290344238 9.28790664672852,13.0296897888184 13.2001752853394,13.0296897888184 L18.3003368377686,13.0296897888184 L18.3003368377686,9.79977798461914 L13.2001752853394,9.79977798461914 C7.58953714370728,9.79977798461914 3,14.3893594741821 3,20 C3,25.6105518341064 7.58953714370728,30.2002239227295 13.2001752853394,30.2002239227295 L18.3003368377686,30.2002239227295 L18.3003368377686,26.9703559875488 L13.2001752853394,26.9703559875488 C9.28790664672852,26.9703998565674 6.22977828979492,23.9074516296387 6.22977828979492,20 M26.7997760772705,9.79977607727051 L21.6996212005615,9.79977607727051 L21.6996212005615,13.0296878814697 L26.7997760772705,13.0296878814697 C30.7093658447266,13.0296878814697 33.7676315307617,16.0902290344238 33.7676315307617,19.9999980926514 C33.7676315307617,23.9074077606201 30.7094097137451,26.9703521728516 26.7997760772705,26.9703521728516 L21.6996212005615,26.9703521728516 L21.6996212005615,30.2002182006836 L26.7997760772705,30.2002182006836 C32.4103698730469,30.2002182006836 37,25.6105480194092 37,19.9999980926514 C36.9999504089355,14.3893585205078 32.4103698730469,9.79977607727051 26.7997760772705,9.79977607727051 Z" p-id="3256" fill="Black" stroke="Null"></path>1⑥fxUsbSerial1属性设置
UsbSerialType:串口通讯协议类型,设置为RS485。
# 7. 程序设计
点击设计界面右下角的按钮,切换至单元选择界面,勾选需要使用的单元。该程序需要引用uUsbSerial单元。
# 7.1. 程序初始设置
在程序启动时,修改数值显示区的外观。
Begin
  fxWidgetLCDLabel1.Caption.FillOff.Color := NULL;
  fxWidgetLCDLabel2.Caption.FillOff.Color := NULL;
  fxWidgetLCDLabel1.Caption.Format := '000.00';
  fxWidgetLCDLabel2.Caption.Format := '000.00';
End.
2
3
4
5
6
# 7.2. 事件设置
- ①fxSuperButtonSearch-OnClick事件
点击按钮加载串口设备列表。
Procedure fxSuperButtonSearchOnClick(Sender: TObject);
//选择连接设备
Begin
  fxComboBox1.Items := fxUsbSerial1.Devices;
  fxComboBox1.DropDown;
End;
2
3
4
5
6
- fxComboBox1-OnChange事件
点击切换设备时显示当前选择的设备信息。
Procedure fxComboBox1OnChange(Sender: TObject);
//显示连接
Begin
  fxUsbSerial1.UsbDevice := fxComboBox1.Items[fxComboBox1.ItemIndex];
  fxLabelMsg.Text := '已连接设备 ' + fxComboBox1.Items[fxComboBox1.ItemIndex];
End;
2
3
4
5
6
- ⑤fxSuperButtonConnect-OnClick事件
点击以开启串口进行通信连接,启用计时器。
Procedure fxSuperButtonConnectOnClick(Sender: TObject);
//连接端口
Begin
  fxUsbSerial1.Open(True);
  fxTimer1.Enabled := True;
  fxLabelMsg.Text := '已开启读取'
End;
2
3
4
5
6
7
- fxTimer1-OnTimer事件
程序每隔五秒钟进行一次读取操作。
Procedure fxTimer1OnTimer(Sender: TObject);
//开启计数
Begin
  fxUsbSerial1.ReadHoldingRegisters(2,0,2);
End;
2
3
4
5
- ⑥fxUsbSerial1-OnReadHoldingRegisters事件
当Usb串口控件读取Modbus设备的保持寄存器时触发事件,用于接收返回的数据结果。
Procedure fxUsbSerial1OnReadHoldingRegisters(Sender: TObject; ReceiveData: string; UserData: string);
//读取并转换计数
var
  s: TStrings;
Begin
  s := TStringlist.Create;
  s.CommaText := UserData;
  if s.Count = 2 Then
  begin
    fxWidgetLCDLabel1.Caption.Value := StrToInt(s[0]) * 0.01;
    fxWidgetLCDLabel2.Caption.Value := StrToInt(s[1]) * 0.01;
  End;
  s.Free;
End;
2
3
4
5
6
7
8
9
10
11
12
13
14
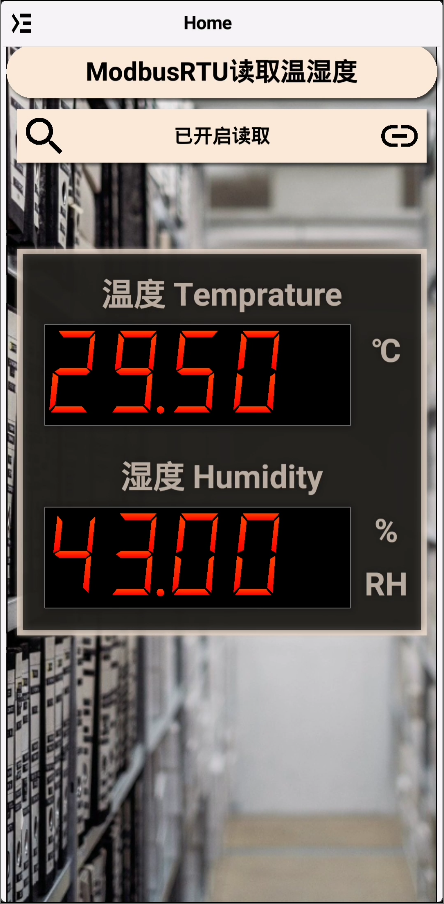
# 8. 运行结果
使用鼠标在 PinToo 菜单,点击[保存至数据库]按钮,将其保存至数据库,点击[调试运行]确认能够正常打开。

通过同步中心,将程序上传至手机PinToo运行;同步时,请确保手机已经运行PinToo,并且已经登陆。
将手机与RS485转USB的端口相连接,为Arduino通电,在手机端点击搜索按钮,在弹出的列表中选择串口端口,点击右侧的连接按钮开启串口,每隔5秒钟更新温度及湿度信息。