
 RestAPI控制LED灯(WEB)
# FastWeb之RestAPI控制LED灯
- 适用平台:WEB(桌面)
# 1. 说明
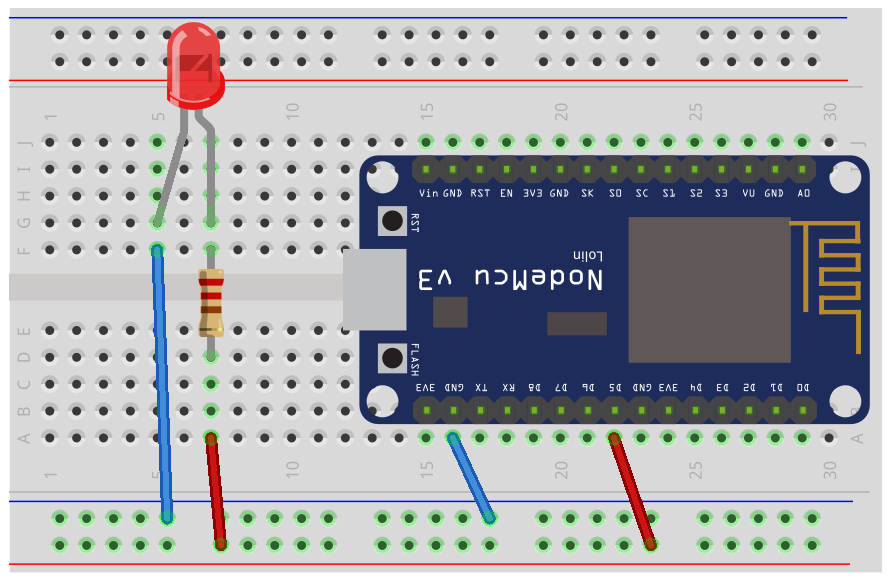
本范例采用RestAPI通讯,来控制连接到NodeMCU的LED灯。NodeMCU是以ESP8266(ESP12)晶片为基础,包含了WiFi,GPIO,PWM,ADC,I2C等功能的主控板,执行效率高,非常适合物联网应用开发,因为它内建了WiFi功能,与Arduino相容,Arduino中可用的传感器基本都可用于NodeMCU。范例中使用的LED灯正极(长脚)连接电阻再连接至NodeMCU D5针脚,LED灯负极连接到NodeMCU GND针脚。
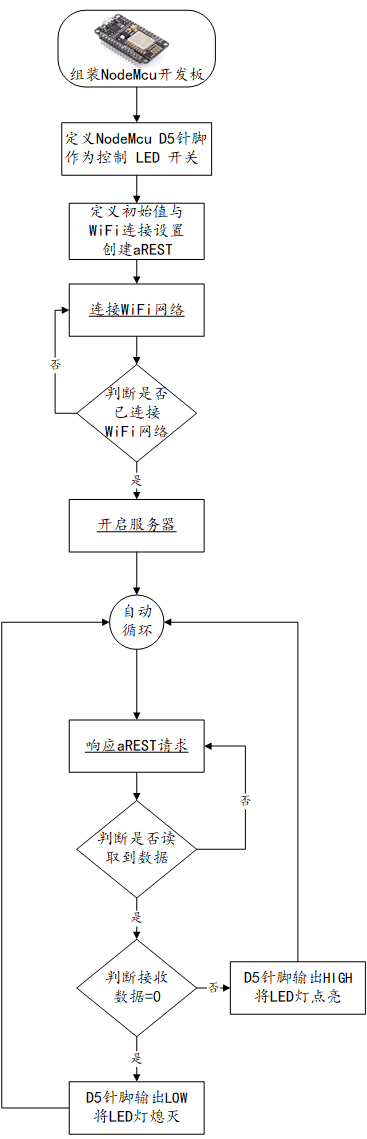
范例中使用的NodeMCU的ESP8266无线网络,先从路由器获取IP,连接网络成功后,启动Rest服务,如果从Rest获取到LED的参数为0,NodeMCU D5针脚输出为地电平,LED灯熄灭,反之,NodeMCU D5针脚输出为高电平,LED灯点亮。
通过本范例学习,可以掌握Rest通讯的基本通讯原理,并结合NodeMCU开发板进行LED的控制功能。
# 2. 零件连接图
# 3. 使用零件
| 序 | 零件名称 | 数量 |
|---|---|---|
| 1 | NodeMCU 开发板 | 1 |
| 2 | USB数据线 | 1 |
| 3 | 面包板 | 1 |
| 4 | 杜邦线 | 若干 |
| 5 | LED灯 | 1 |
| 6 | 220欧姆电阻 | 1 |
# 4. Arduino流程图
# 5. Arduino程序
使用Arduino IDE 编译并上传以下Arduino程序。
// 使用 NodeMCU 开发板
// aREST
//https://github.com/marcoschwartz/aREST
//aRESTUI
//https://github.com/marcoschwartz/aREST_UI

#include <ESP8266WiFi.h>
#include <aREST.h>
#include <aREST_UI.h>


#define LED_PIN 14   //定义LED针脚D5

// 创建aREST实例
aREST_UI rest = aREST_UI();

// WiFi连接参数
const char* ssid = "WIFI_SSID";
const char* password = "WIFI_PASSWORD";

// 监听TCP连接
#define LISTEN_PORT           80

// 创建WiFi服务器
WiFiServer server(LISTEN_PORT);

// 定义使用API的函数
int ledControl(String command);

void setup(void)
{
  // 开启串口
  Serial.begin(9600);

  // 设定标题
  rest.title("aREST LED Control");

  // 给D5针脚提供按钮
  rest.button(LED_PIN);

  // 设定暴露给aREST的函数
  rest.function("led",ledControl);

  // 给设备定义ID与名称
  rest.set_id("1");
  rest.set_name("esp8266");

   //指定IP位址,请自行在此加入WiFi.config()叙述。
  WiFi.config(IPAddress(192,168,0,170),           // IP地址
               IPAddress(192,168,0,1),             // 网关地址
               IPAddress(255,255,255,0));          // 子网掩码
  WiFi.begin(ssid, password);
  while (WiFi.status() != WL_CONNECTED) {
    delay(500);
    Serial.print(".");
  }
  Serial.println("");
  Serial.println("WiFi connected");

  // 开启服务器
  server.begin();
  Serial.println("Server started");

  // 输出IP地址
  Serial.println(WiFi.localIP());
  pinMode(LED_PIN, OUTPUT);   //设定D5针脚为输出模式
}

void loop() {

  // 响应aREST
  WiFiClient client = server.available();
  if (!client) {
    return;
  }
  while(!client.available()){
    delay(1);
  }
  rest.handle(client);

}

// API函数定义
int ledControl(String command) {

  // 从命令URL中获取状态
  int state = command.toInt();

  digitalWrite(LED_PIN,state);
  return 1;
}
2
3
4
5
6
7
8
9
10
11
12
13
14
15
16
17
18
19
20
21
22
23
24
25
26
27
28
29
30
31
32
33
34
35
36
37
38
39
40
41
42
43
44
45
46
47
48
49
50
51
52
53
54
55
56
57
58
59
60
61
62
63
64
65
66
67
68
69
70
71
72
73
74
75
76
77
78
79
80
81
82
83
84
85
86
87
88
89
90
91
# 6. 设计明细
开启FastWeb设计器,分别加入下插图之控件。或者点击左上角的[打开模板Lib文件]选择模板文件来打开对应模板。

①:TUgLabel组件,控件名称为UgLabel01。
②:TUgSwitchImage组件,控件名称为ugSwitchImage02。
③:TUgImage组件,控件名称为UgImage01。
④:TUgTimer组件,控件名称为UgTimer01。
⑤:TUgSwitchImage组件,控件名称为ugSwitchImage01。
UgWebRunFrame属性设置
Height:设置窗体高度=360。Width:设置窗体宽度=480。
①UgLabel01属性设置
Caption:设置显示的字幕内容=RestAPI控制LED灯。Font.Color:设置显示的字体颜色=clWhite。Size:设置字体大小=10。
②ugSwitchImage02属性设置
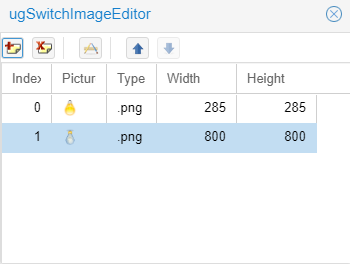
Height:设置控件高度=50。Width:设置控件宽度=50。Stretch:设置画面拉伸=True。双击该控件,打开图像编辑器列表,点击添加按钮打开文件上传界面,点击右侧的[Browse...]打开图像浏览界面,选择图像后,点击[确定]按钮返回到文件上传界面,点击[Upload]将文件上传至编辑器中,待图片显示后,关闭该对话框,注意开状态的图片位于索引0,关状态的图片位于索引1。

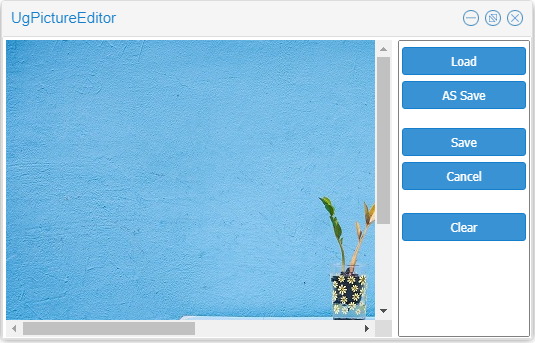
③UgImage01属性设置
Height:设置控件高度=360。Width:设置控件宽度=480。Stretch:设置画面拉伸=True。Picture:设置图像(背景图片)。点击Picture属性右侧的[√],打开图像编辑器,点击[Load]按钮打开文件上传界面,点击右侧的[Browse...]打开图像浏览界面,选择图像后,点击[确定]按钮返回到文件上传界面,点击[Upload]将文件上传至编辑器中,待图片显示后,点击[Save]按钮即可。

⑤ugSwitchImage01属性设置
Height:设置控件高度=50。Width:设置控件宽度=50。Stretch:设置画面拉伸=True。- 双击该控件,打开图像编辑器列表,点击添加按钮打开文件上传界面,点击右侧的
[Browse...]打开图像浏览界面,选择图像后,点击[确定]按钮返回到文件上传界面,点击[Upload]将文件上传至编辑器中,待图片显示后,关闭该对话框,注意开状态的图片位于索引0,关状态的图片位于索引1。当IsChecked属性为True时,显示索引为0的图片,反之,显示索引为1的图片。


# 7. 程序设计
点击程序设计界面右下角的Unit按钮,切换至单元选择界面,勾选需要使用的单元。该程式的程序需要引用Rest API单元。
# 7.1. 程序初始设置
该程式无程序初始设置。
# 7.2. 事件设置
- ⑤UgTimer01-OnTimer事件
计时器事件,定时刷新LED灯的状态。
//JScript
function UgTimer01OnTimer(sender)
{
  var h= new TIDHttp(Nil);
  var J= new TJSONObject();
  Try
  {
    h.HandleRedirects = true;
    h.ReadTimeout = 5000;
    var ledJSONString = h.Post("http://192.168.0.170/digital/14",nil);
    var Valueled = j.ParseJSONValue(ledJSONString,false,false);
    var LED = TJSONObject(Valueled).get(0).JsonValue.Value;
  if (LED == "0") {
  //灭灯
    UgSwitchImage02.IsChecked = False;
    ugSwitchImage01.IsChecked = False;
  }
  Else
  //开灯
  {
    UgSwitchImage02.IsChecked = True;
    ugSwitchImage01.IsChecked = True;
  }
  }
  Finally{
    Valueled.Free;
    j.Free;
    h.Free;
  }
}
2
3
4
5
6
7
8
9
10
11
12
13
14
15
16
17
18
19
20
21
22
23
24
25
26
27
28
29
30
//PasScript
procedure UgTimer01OnTimer(sender: tobject);
var
  LED:String;
  h:TIDHttp;
  ledJSONString:string;
  J:TJSONObject;
  Valueled: TJSONValue;
begin
  h:=TIDHttp.Create(Nil);
  J:=TJSONObject.Create;
  Try
    h.HandleRedirects := true;
    h.ReadTimeout := 5000;
    ledJSONString := h.Post('http://192.168.0.170/digital/14',nil);
    Valueled := j.ParseJSONValue(ledJSONString,false,false);
    LED := TJSONObject(Valueled).get(0).JsonValue.Value;
  if LED = '0' Then
  //灭灯
  Begin
    UgSwitchImage02.IsChecked := False;
    ugSwitchImage01.IsChecked := False;
  end
  Else
  //开灯
  Begin
    UgSwitchImage02.IsChecked := True;
    ugSwitchImage01.IsChecked := True;
  End;
  Finally
    Valueled.Free;
    j.Free;
    h.Free;
  end;
end;
2
3
4
5
6
7
8
9
10
11
12
13
14
15
16
17
18
19
20
21
22
23
24
25
26
27
28
29
30
31
32
33
34
35
// Make sure to add code blocks to your code group
- ⑤ugSwitchImage01属性设置
点击开关,向设备发送对应的指令,同时灯的显示状态也发生变化。
//JScript
function ugSwitchImage01OnSwitch(sender)
{
  var h=TIDHttp.Create(Nil);
  var l=TStringList.Create;
  var s;
  Try{
    h.HandleRedirects = true;
    h.ReadTimeout = 5000;
		if (ugSwitchImage01.IsChecked)
    {
      s = h.Post("http://192.168.0.170/led?params=1",nil);
 		  UgSwitchImage02.IsChecked = True;
    }
    else
    {
      s = h.Post("http://192.168.0.170/led?params=0",nil);
 		  UgSwitchImage02.IsChecked = False;
    }
  }
  Finally{
    h.Free;
  }
}
2
3
4
5
6
7
8
9
10
11
12
13
14
15
16
17
18
19
20
21
22
23
24
//PasScript
procedure ugSwitchImage01OnSwitch(sender: tobject);
Var
  h:TIDHttp;
  l:TStringList;
  s:string;
Begin
  h:=TIDHttp.Create(Nil);
  l:=TStringList.Create;
  Try
    h.HandleRedirects := true;
    h.ReadTimeout := 5000;
		if ugSwitchImage01.IsChecked then
    begin
      s := h.Post('http://192.168.0.170/led?params=1',nil);
 		  UgSwitchImage02.IsChecked := True;
    end
    else
    begin
      s := h.Post('http://192.168.0.170/led?params=0',nil);
 		  UgSwitchImage02.IsChecked := False;
    end;
  Finally
    h.Free;
  end;
end;
2
3
4
5
6
7
8
9
10
11
12
13
14
15
16
17
18
19
20
21
22
23
24
25
26
// Make sure to add code blocks to your code group
# 8. 运行结果
使用鼠标点击工具栏保存到数据库,然后点击运行(Run),测试运行结果。
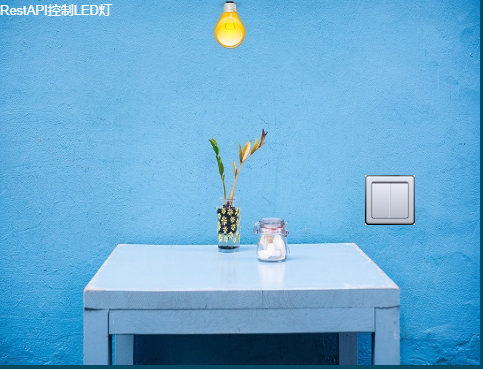
点击右侧的开关图像,开关打开,上方的灯泡切换为亮灯的状态,同时连接Arduino开发板的LED发光二极管处于点亮的状态;在亮灯状态下,点击右侧的开关图像,开关关闭,上方的灯泡切换为灯灭的状态,同时连接Arduino开发板的LED发光二极管处于关闭的状态。