
 图像识别(WEB)
# FastWeb之图像识别(WEB)
# 1. 说明
通过ml5js的图像识别分类功能,辅助实现图像识别的相关功能。ml5js (opens new window)是基于tensorflow.js的深度学习框架,它安装简便,API简单易懂,可直接在浏览器里面运行,可作为轻量化的智能识别工具。此示例需要在线调用数据模型,且会调用摄像头的相关权限,故此处建议使用https来访问FastWeb中的此示例。
通过本范例学习,可以掌握ml5js的调用方式,并通过摄像头拍照以及图片上传两种方式实现图像识别的相关功能。
使用此示例前,请先确保访问FastWeb的客户端能够访问互联网的资源,此处使用的是在线的数据模型资源。
# 2. 设计明细
开启FastWeb设计器,分别加入下插图之控件。或者点击左上角的[导入]选择模板文件来打开对应模板。
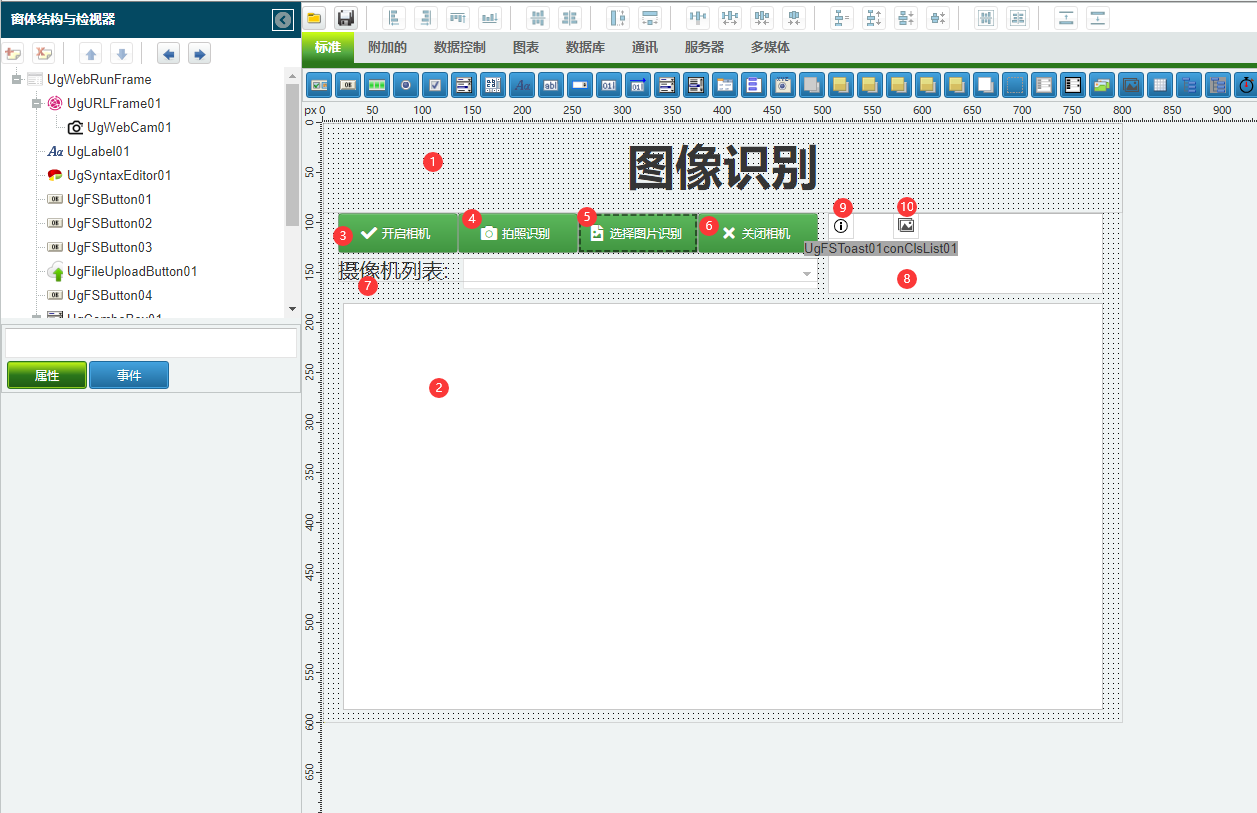
1:TUgLabel组件,控件名称为UgLabel01。
2:TUgURLFrame组件,控件名称为UgHTMLFrame01,此控件用于运行示例
3:TUgFSButton组件,控件名称为UgFSButton01。
4:TUgFSButton组件,控件名称为UgFSButton02。
5:TUgFSButton组件,控件名称为UgFSButton03。
TUgFileUploadButton组件,控件名称为UgFileUploadButton01。
6:TUgFSButton组件,控件名称为UgFSButton04。
7:TUgComboBox组件,控件名称为UgComboBox01。
8:TUgMemo组件,控件名称为UgMemo01。
9:TUgFSToast组件,控件名称为UgFSToast01。
10:TUgIconClsList组件,控件名称为UgIconClsLit01。
11:TUgTimer组件,控件名称为UgTimer01。
TUgImage组件,控件名称为UgImage02,此控件与UgWebCam01重叠,用于显示拍照的相片。
TUgWebCam组件,控件名称为UgWebCam01。此控件用于调用相机进行拍摄,但是控件不显示。
TUgSynTaxEditor组件,控件名称为UgSynTextEditor01,此控件用于放置运行的HTML文本,但是控件不显示。
UgWebRunFrame属性设置
Height:设置页面高度=600。Width:设置页面宽度=800。
1:UgLabel01属性设置
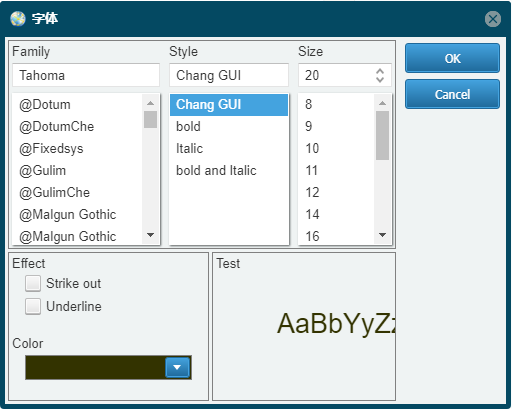
Align:设置控件的对齐方式,设置为alTop。Alignment:设置控件中的文本的对齐方式,设置为taCenter。AutoSize:设置控件是否跟随文字大小变化控件大小,设置为False。Caption:设置显示的文本内容,设置为图像识别。Font:设置字体,点击√打开字体设置界面。
2:UgURLFrame01属性设置
Anchors:设置锚点信息,设置akLeft、akTop、akRight、akBottom为True。
UgWebCam01属性设置
Align:其位于UgURLFrame01控件中,设置锚点信息,设置akLeft、akTop、akRight、akBottom为True。
7:UgIconClsList10属性设置
双击控件,打开编辑器,依次添加以下几项的图标,方括号中的内容为需要输入的名称。

3:UgFSButton01属性设置
Anchors:设置锚点信息,设置akLeft、akTop为True,其余选项为False。Caption:设置显示的文字内容,设置为开启相机。Images:设置显示图标的控件,设置为UGIconClsList01。ImageIndex:设置显示的图标的序号,设置为0。
4:UgFSButton02属性设置
Anchors:设置锚点信息,设置akLeft、akTop为True,其余选项为False。Caption:设置显示的文字内容,设置为拍照识别。Enabled:设置控件是否其余,设置为False。Images:设置显示图标的控件,设置为UGIconClsList01。ImageIndex:设置显示的图标的序号,设置为1。
5:UgFSButton03属性设置
Anchors:设置锚点信息,设置akLeft、akTop为True,其余选项为False。Caption:设置显示的文字内容,设置为选择图片识别。Images:设置显示图标的控件,设置为UGIconClsList01。ImageIndex:设置显示的图标的序号,设置为2。
6:UgFSButton04属性设置
Anchors:设置锚点信息,设置akLeft、akTop为True,其余选项为False。Caption:设置显示的文字内容,设置为关闭相机。Images:设置显示图标的控件,设置为UGIconClsList01。ImageIndex:设置显示的图标的序号,设置为3。
7:UgComboBox01属性设置
FieldLabel:设置标签信息,设置为摄像机列表。FieldLabelWidth:设置标签显示区域的宽度,设置为120。
8:UgMemo01属性设置
Anchors:设置锚点信息,设置akLeft、akRight、akTop为True,其余选项为False。
UgSyntaxEditor01属性设置
Lines:设置其中显示的文本信息。打开编辑器,填写的内容如下:
<html>
    <head>
        <meta charset="UTF-8" />
        <meta http-equiv="X-UA-Compatible" content="IE=edge" />
        <meta name="viewport" content="width=device-width, initial-scale=1" />
        <title>基于单幅图像的COCOSSD图像检测</title>
        <script src="https://cdnjs.cloudflare.com/ajax/libs/p5.js/1.1.9/p5.min.js"></script>
        <script src="https://unpkg.com/ml5@0.7.1/dist/ml5.min.js" type="text/javascript"></script>
    </head>
    <body>
    </body>
    <script>
        // Copyright (c) 2020 ml5
        //
        // This software is released under the MIT License.
        // https://opensource.org/licenses/MIT

        /* ===
        ml5 Example
        Object Detection using COCOSSD
        This example uses a callback pattern to create the classifier
        === */


        let objectDetector;
        let img;
        let detections = [];

        function preload() {
            img = loadImage('library/js/ml5-library/assets/bird.jpg');
            // Models available are 'cocossd', 'yolo'
            objectDetector = ml5.objectDetector('cocossd', modelReady);
        }

        function modelReady() {
            objectDetector.detect(img, gotDetections);
        }

        function gotDetections(error, results) {
            if (error) {
                console.error(error);
            }
            detections = results;

            console.log(results);

            if (detections.length > 0) {
                var URLFrame = top.Ext.getCmp("_URLFrame");
                var params = [];
                params = ["result=" + results[0].label, "probability=" + nfc(results[0].confidence * 100.0, 2)];
                top.ajaxRequest(URLFrame, 'OutputData', params);
            }

        }

        function draw() {
            createCanvas(640, 480);
            image(img, 0, 0);
            for (let i = 0; i < detections.length; i += 1) {
                const object = detections[i];
                stroke(0, 255, 0);
                strokeWeight(4);
                noFill();
                rect(object.x, object.y, object.width, object.height);
                noStroke();
                fill(255);
                textSize(24);
                text(object.label, object.x + 10, object.y + 24);
            }
        }

        function upimage(s) {
            img = loadImage(s);
            setTimeout(function() {
                objectDetector.detect(img, gotDetections);
            }, 200);
        }
    </script>
</html>
1
2
3
4
5
6
7
8
9
10
11
12
13
14
15
16
17
18
19
20
21
22
23
24
25
26
27
28
29
30
31
32
33
34
35
36
37
38
39
40
41
42
43
44
45
46
47
48
49
50
51
52
53
54
55
56
57
58
59
60
61
62
63
64
65
66
67
68
69
70
71
72
73
74
75
76
77
78
79
80Visible:设置控件是否可见,设置为False。
UgFileUploadButton01属性设置
Anchors:设置控件的锚点,设置akLeft与akBottom为True,其余设置为False。ButtonVisible:设置按钮是否处于可见状态,设置为False。Filter:设置过滤器,设置常用的图片后缀格式,设置为*.jpg;*.jpeg;*.gif;*.tif。
# 3. 脚本设计
点击脚本设计界面右下角的按钮,切换至单元选择界面,勾选需要使用的单元。该程序无需引用单元。
# 3.1. 脚本初始设置
定义脚本过程,用于设置两种状态下显示的按钮序列差异。
//JScript
function RefState(AStatus)
//刷新按钮的状态
//1:表示为处于拍摄模式
//2:表示当前处于图片处理模式
{
  UgWebCam01.CameraName = UgComboBox01.Text;
  if (AStatus == 0)
  {
    UgWebCam01.Visible = True;
    UgWebCam01.StartCamera;
    UgFSButton01.Enabled = False;
    UgFSButton02.Enabled = True;
    UgFileUpLoadButton01.Enabled = False;
    UgFSButton04.Enabled = True;
  }
  if (AStatus == 1)
  {
    UgWebCam01.Visible = False;
    UgWebCam01.StopCamera;
    UgFSButton01.Enabled = True;
    UgFSButton02.Enabled = False;
    UgFileUpLoadButton01.Enabled = True;
    UgFSButton04.Enabled = False;
  }
}

{
  Self.OnAfterRunScript = &UgWebRunFrameOnAfterRunScript;
  UgWebCam01.OnCameraList = &UgWebCam01OnCameraList;
  UgWebCam01.OnError = &UgWebCam01OnError;
  UgWebCam01.OnSnap = &UgWebCam01OnSnap;
  UgFSButton01.OnClick = &UgFSButton01OnClick;
  UgFSButton04.OnClick = &UgFSButton04OnClick;
  UgFSButton02.OnClick = &UgFSButton02OnClick;
  UgFileUploadButton01.OnCompleted = &UgFileUpLoadButton01OnCompleted;
  UgImageClassifier01.OnResult = &UgImageClassifier01OnResult;
  UgURLFrame01.OnAjaxEvent = &UgURLFrame01OnAjaxEvent;

  UgURLFrame01.ClientEvents.UniEvents.Values["beforeInit"] = "function beforeInit(sender, config){config.id = '_URLFrame';}";
  RefState(1);
}
2
3
4
5
6
7
8
9
10
11
12
13
14
15
16
17
18
19
20
21
22
23
24
25
26
27
28
29
30
31
32
33
34
35
36
37
38
39
40
41
42
//PasScript
procedure RefState(AStatus: Integer);
//刷新按钮的状态
//1:表示为处于拍摄模式
//2:表示当前处于图片处理模式
Begin
  UgWebCam01.CameraName := UgComboBox01.Text;
  if AStatus = 0 Then
  Begin
    UgWebCam01.Visible := True;
    UgWebCam01.StartCamera;
    UgFSButton01.Enabled := False;
    UgFSButton02.Enabled := True;
    UgFileUpLoadButton01.Enabled := False;
    UgFSButton04.Enabled := True;
  End;
  if AStatus = 1 Then
  Begin
    UgWebCam01.Visible := False;
    UgWebCam01.StopCamera;
    UgFSButton01.Enabled := True;
    UgFSButton02.Enabled := False;
    UgFileUpLoadButton01.Enabled := True;
    UgFSButton04.Enabled := False;
  End;
End;

//初始化界面,更新设置
Begin
  UgURLFrame01.ClientEvents.UniEvents.Values['beforeInit'] := 'function beforeInit(sender, config){config.id = ''_URLFrame'';}';
  RefState(1);
End.
2
3
4
5
6
7
8
9
10
11
12
13
14
15
16
17
18
19
20
21
22
23
24
25
26
27
28
29
30
31
32
// Make sure to add code blocks to your code group
# 3.2. 事件设置
- UgWebRunFrame-OnAfterRunScript事件
初始化运行状态,设置网页显示的内容。
//JScript
function UgWebRunFrameOnAfterRunScript(sender)
{
  UGMM.LC(Self);
  UgURLFrame01.HTML = UgSyntaxEditor01.Lines;
}
2
3
4
5
6
7
//PasScript
procedure UgWebRunFrameOnAfterRunScript(const sender: tobject);
begin
  UGMM.LC(Self);
  UgURLFrame01.HTML := UgSyntaxEditor01.Lines;
end;
2
3
4
5
6
// Make sure to add code blocks to your code group
- UgWebCam01-OnCameraList事件
此事件用于在启动时获取当前可用的摄像机的设备列表。
//JScript
function UgWebCam01onCameraList(sender)
//获取摄像机列表
{
  UgComboBox01.Items.Clear;
  for (var i = 0; i <= UgWebCam01.CameraList.Count - 1; i++ )
    UgComboBox01.Items.Add(UgWebCam01.CameraList.Names[i]);
  if (UgComboBox01.Items.Count > 0)
    UgComboBox01.ItemIndex= 0;
}
2
3
4
5
6
7
8
9
10
//PasScript
procedure UgWebCam01onCameraList(sender: tobject);
//获取摄像机列表
var
  i: Integer;
begin
  UgComboBox01.Items.Clear;
  for i := 0 to UgWebCam01.CameraList.Count-1 do
    UgComboBox01.Items.Add(UgWebCam01.CameraList.Names[i]);
  if UgComboBox01.Items.Count>0 then
    UgComboBox01.ItemIndex:= 0;
end;
2
3
4
5
6
7
8
9
10
11
12
// Make sure to add code blocks to your code group
- UgWebCam01-OnError事件
当相机在运行的过程中出现错误时触发事件,该事件中包含了错误的相关信息。
//JScript
function UgWebCam01onError(sender,error)
//相机启动出错时的提示信息
{
  UgFSToast01.Info("",error);
}
2
3
4
5
6
//PasScript
procedure UgWebCam01onError(sender: tobject;const error: string);
//相机启动出错时的提示信息
begin
  UgFSToast01.Info('',error);
end;
2
3
4
5
6
// Make sure to add code blocks to your code group
- UgWebCam01-OnSnap事件
当照相机在执行照相操作后触发此事件,将照相机拍摄获得的图片保存后发送以进行识别。
//JScript
function UgWebCam01onSnap(sender,filename)
//拍照的结果
{
  RefState(1);
  var DestFolder=UGSM.StartPath+"UploadFolder\\";
  var RemoteFileName = UGMM.CreateGuid + ".jpg";
  var DestName=DestFolder+RemoteFileName;
  //上传文件
  CopyFile(filename, DestName, False);
  var imgPath = "UploadFolder/"+RemoteFileName;
  UniSession.AddJS(UgURLFrame01.JSName+".iframe.contentWindow.upimage('"+imgPath+"')");
  //UgTimer01.Enabled = True;
}
2
3
4
5
6
7
8
9
10
11
12
13
14
15
//PasScript
procedure UgWebCam01onSnap(sender: tobject;const filename: string);
//拍照的结果
var
  DestName : string;
  DestFolder : string;
  RemoteFileName: String;
  imgPath: String;
begin
  RefState(1);
  DestFolder:=UGSM.StartPath+'UploadFolder\';
  RemoteFileName := UGMM.CreateGuid + '.jpg';
  DestName:=DestFolder+RemoteFileName;
  //上传文件
  CopyFile(filename, DestName, False);
  imgPath := 'UploadFolder/'+RemoteFileName;
  UniSession.AddJS(UgURLFrame01.JSName+'.iframe.contentWindow.upimage('''+imgPath+''')');
end;
2
3
4
5
6
7
8
9
10
11
12
13
14
15
16
17
18
// Make sure to add code blocks to your code group
- 3:UgFSButton01-OnClick事件
点击开启相机按钮,打开摄像机。
//JScript
function UgFSButton01OnClick(sender)
//开启相机
{
  RefState(0);
}
2
3
4
5
6
//PasScript
procedure UgFSButton01OnClick(sender: tobject);
//开启相机
begin
  RefState(0);
end;
2
3
4
5
6
// Make sure to add code blocks to your code group
- 4:UgFSButton02-OnClick事件
点击拍照按钮,以执行拍照。
//JScript
function UgFSButton02OnClick(sender)
//拍摄照片
{
  UgWebCam01.SnapPicture;
}
2
3
4
5
6
//PasScript
procedure UgFSButton02OnClick(sender: tobject);
//拍摄照片
begin
  UgWebCam01.SnapPicture;
end;
2
3
4
5
6
// Make sure to add code blocks to your code group
- 6:UgFSButton04-OnClick事件
点击关闭相机按钮,关闭摄像机。
//JScript
function UgFSButton04OnClick(sender)
//关闭相机
{
  RefState(1);
}
2
3
4
5
6
//PasScript
procedure UgFSButton04OnClick(sender: tobject);
//关闭相机
begin
  RefState(1);
end;
2
3
4
5
6
// Make sure to add code blocks to your code group
- 5:UgFileUploadButton01-OnCompleted事件
当上传图片后,进行判断识别。
//JScript
function UgFileUploadButton01OnCompleted(sender,astream)
//上传图片
{
  //远程文件名
  var RemoteFileName = ExtractFileName(varToStr(TUgFileUploadButton(sender).FileName));
  //远程文件路径
  var DestFolder=UGSM.StartPath+"UploadFolder\\";
  var DestName=DestFolder+RemoteFileName;
  //上传文件
  CopyFile(UGCM.GetFileStreamFileName(AStream), DestName, False);
  //ShowMessage(DestName);
  var imgPath = "UploadFolder/"+RemoteFileName;
  UniSession.AddJS(UgURLFrame01.JSName+".iframe.contentWindow.upimage('"+imgPath+"')");
  //UgTimer01.Enabled = True;
}
2
3
4
5
6
7
8
9
10
11
12
13
14
15
16
//PasScript
procedure UgFileUploadButton01OnCompleted(sender: tobject;astream: tfilestream);
//上传图片
var
  DestName : string;
  DestFolder : string;
  RemoteFileName:String;
  imgPath:String;
begin
  //远程文件名
  RemoteFileName := ExtractFileName(VarToStr(TUgFileUploadButton(sender).FileName));
  //远程文件路径
  DestFolder:=UGSM.StartPath+'UploadFolder\';
  DestName:=DestFolder+RemoteFileName;
  //上传文件
  CopyFile(UGCM.GetFileStreamFileName(AStream), DestName, False);
  //ShowMessage(DestName);
  imgPath := 'UploadFolder/'+RemoteFileName;
  UniSession.AddJS(UgURLFrame01.JSName+'.iframe.contentWindow.upimage('''+imgPath+''')');
end;
2
3
4
5
6
7
8
9
10
11
12
13
14
15
16
17
18
19
20
// Make sure to add code blocks to your code group
- 2:UgURLFrame01-OnAjaxEvent事件
当识别到Ajax事件时触发,执行相关的脚本,输出识别的结果信息。
//JScript
function UgURLFrame01OnAjaxEvent(sender,eventname,params)
//识别结果输出
{
  if (eventname == "OutputData")
  {
    UgMemo01.Lines.Add(UGMM.LT("识别项:")+params.Values["result"]);
    UgMemo01.Lines.Add(UGMM.LT("可信度:")+params.Values["probability"]);
  }
}
2
3
4
5
6
7
8
9
10
//PasScript
procedure UgURLFrame01OnAjaxEvent(sender: tcomponent;eventname: string;params: tunistrings);
//识别结果输出
begin
  if eventname = 'OutputData' Then
  Begin
    UgMemo01.Lines.Add(UGMM.LT('分类项:')+params.Values['result']);
    UgMemo01.Lines.Add(UGMM.LT('可信度:')+params.Values['probability']);
  end;
end;
2
3
4
5
6
7
8
9
10
// Make sure to add code blocks to your code group
# 4. 运行结果
使用鼠标在FastWeb菜单,点击[保存至数据库]按钮,将其保存至数据库,点击[调试运行]确认能够正常打开。
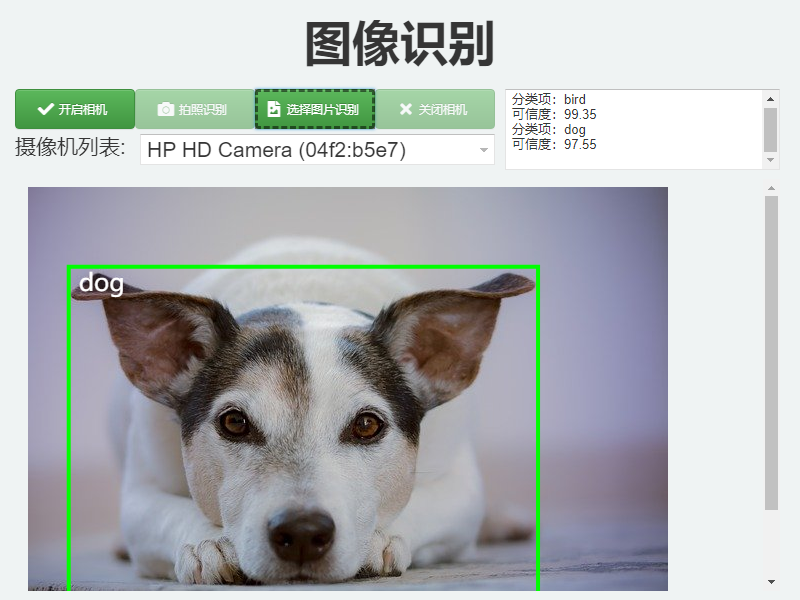
打开示例,选择图片加载,可从加载的图片中查看识别的结果信息。